In TBC Classic, BiS changes as raid tiers unlock:
- Pre-Raid: Heroics, reputations, crafted items, badges (as available), and quest rewards.
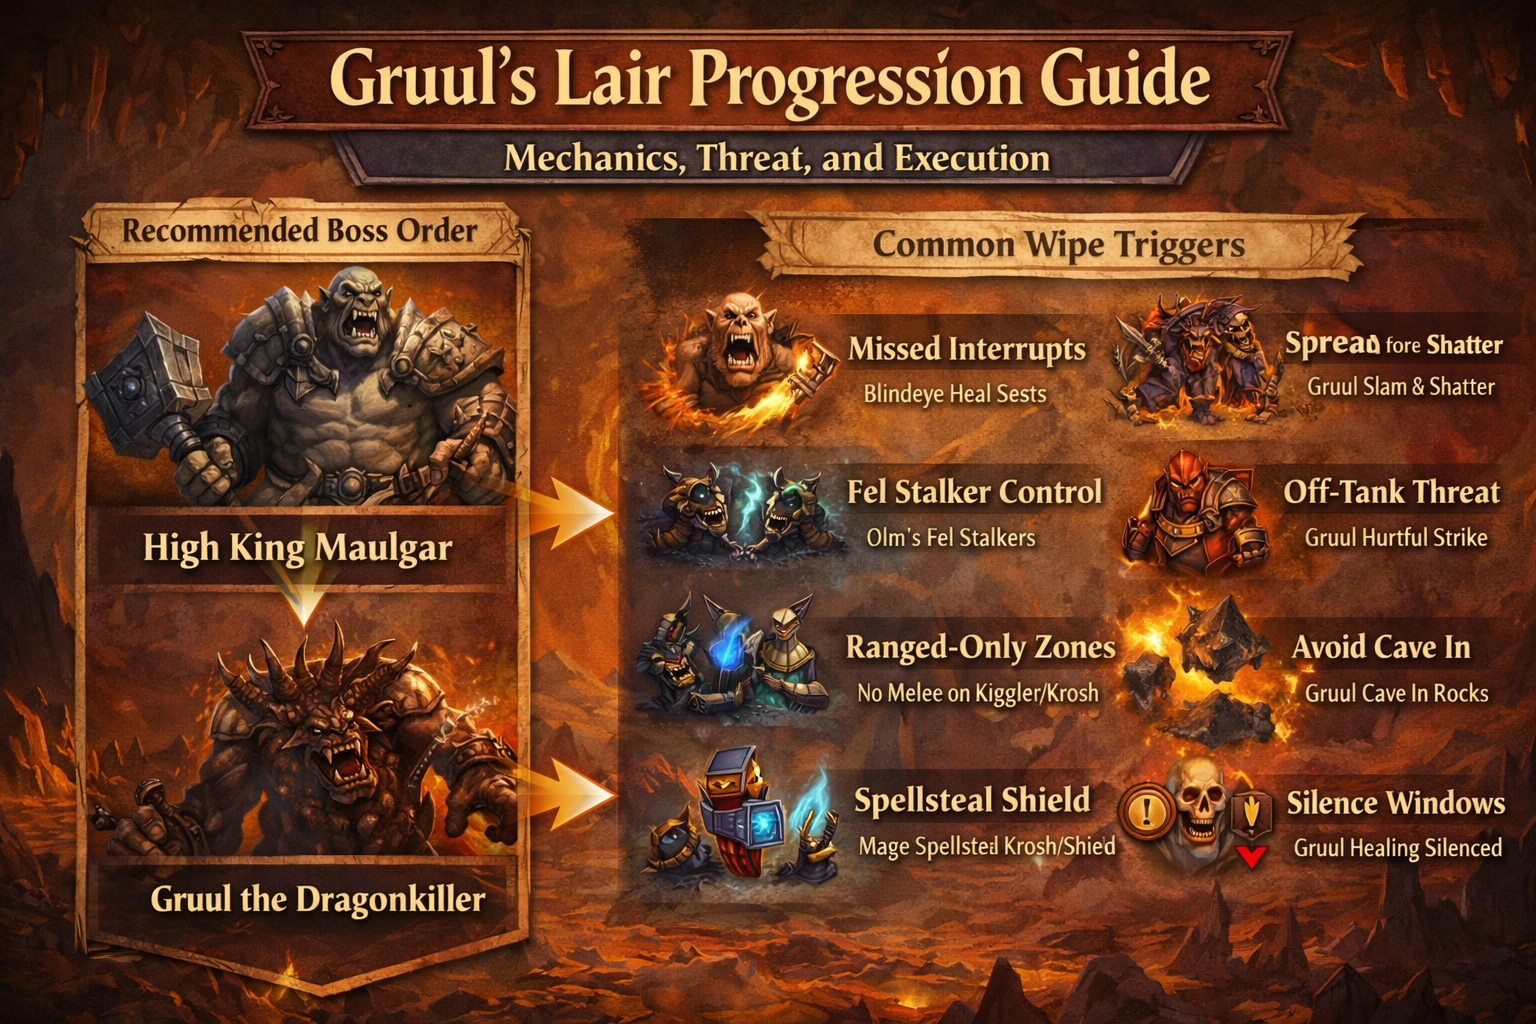
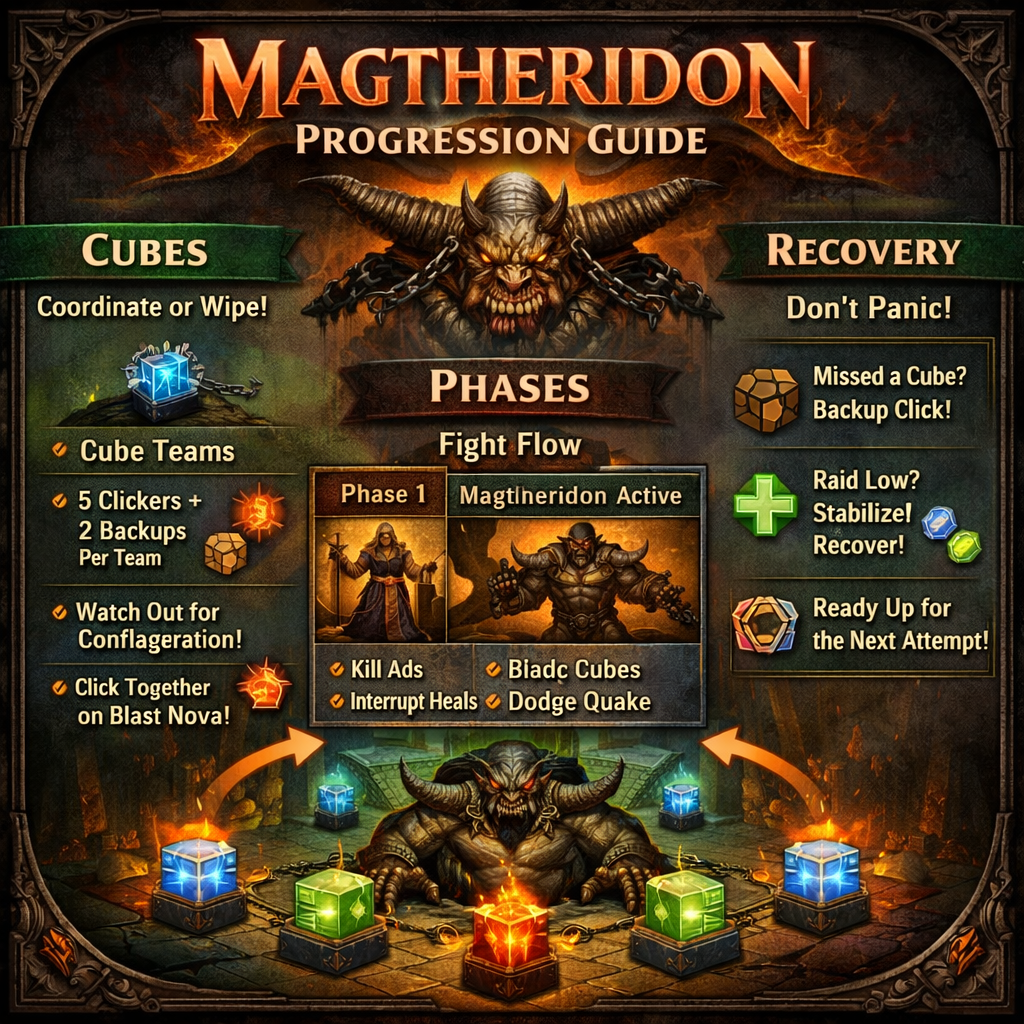
- Phase 1 (Tier 4): Karazhan, Gruul’s Lair, Magtheridon.
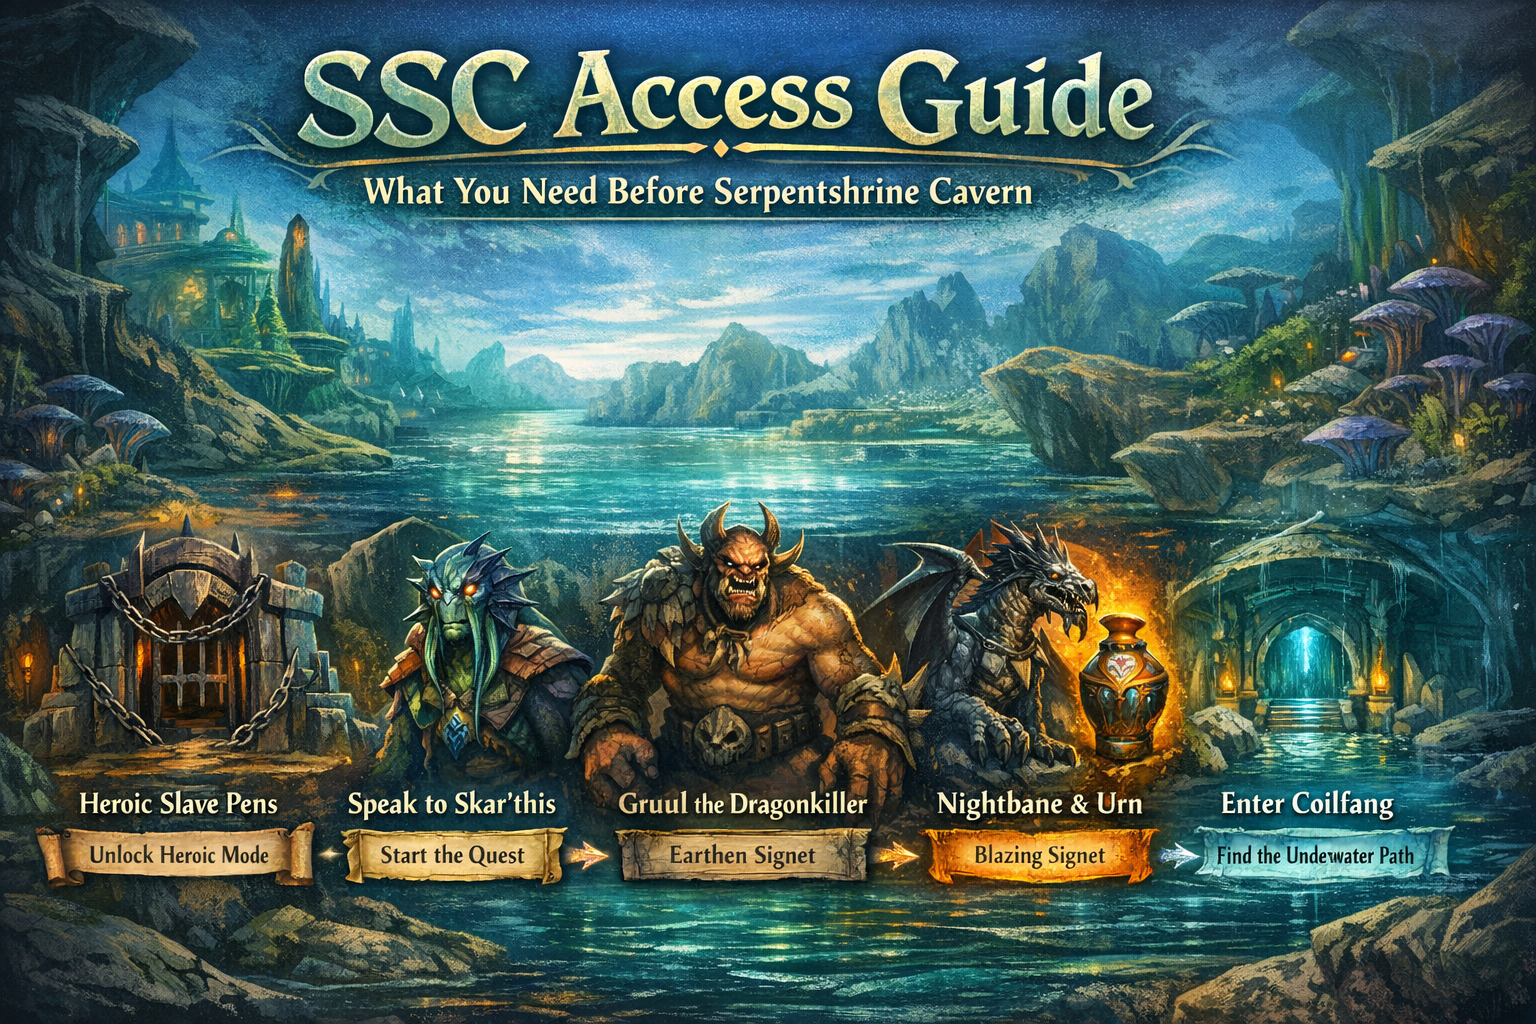
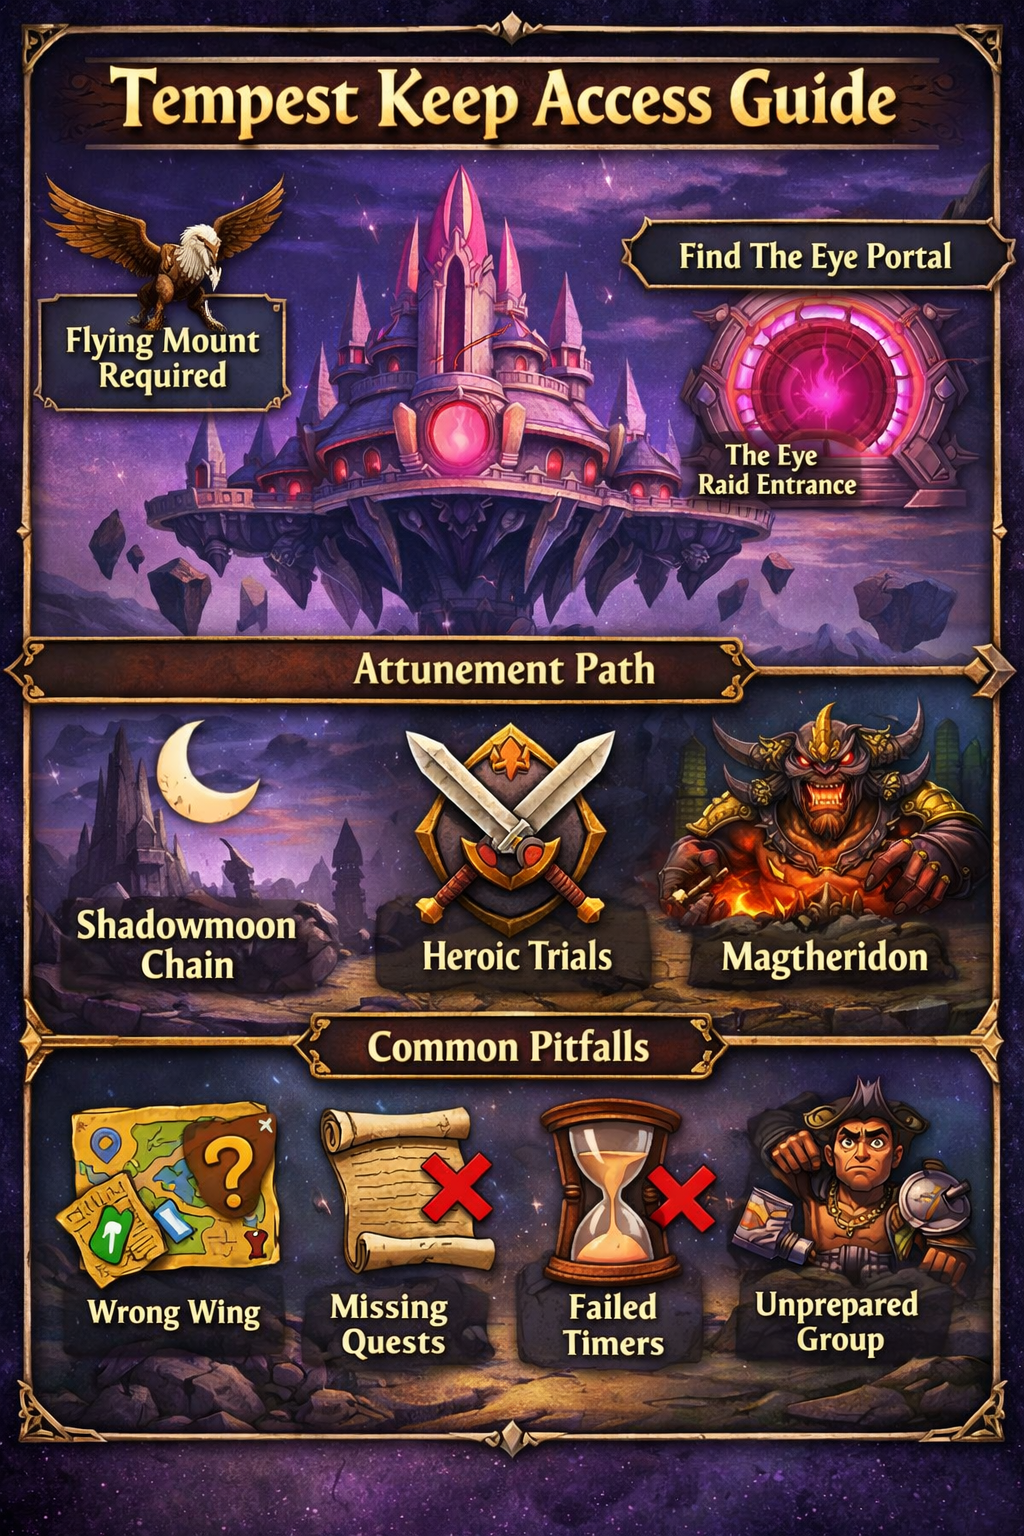
- Phase 2 (Tier 5): Serpentshrine Cavern (SSC), Tempest Keep (TK).
- Phase 3/4: Hyjal Summit, Black Temple, Zul’Aman (ZA).
- Phase 5: Sunwell Plateau and endgame badge upgrades.
If you’re not sure which tier you’re gearing for, use this rule: gear for the hardest content you’re currently progging, not the content you hope to do later.
Universal Paladin BiS Rules (That Save You Weeks)
1) Don’t Mix Roles Unless You Intend To
A “good-looking” item can be awful for your actual job.
- Holy cares about healing throughput + mana longevity.
- Protection cares about survival first, then threat.
- Retribution cares about physical DPS scaling (hit/expertise/Strength/haste).
If you’re building an off-spec, build it intentionally as a separate set. Hybrid gear almost always underperforms.
2) Caps Beat Pretty Stats
Some stats jump in value until you hit a key threshold. Past that, they drop.
- Retribution: hit and expertise are your “stop missing” stats.
- Protection: you must reach crit immunity goals and build consistent mitigation.
- Holy: you’re balancing throughput vs. not going OOM.
3) Trinkets Are Often Your Biggest Upgrade
Two trinkets can outperform multiple armor swaps. Plan your trinkets early, especially if your guild has competition on drops.
4) Badges Are a Strategy, Not a Shopping Spree
Badge vendors (especially late TBC) can “skip” painful RNG. The smartest Paladins spend badges on:
- high-impact slots (trinkets, cloaks, rings, weapons/off-hands depending on spec),
- or slots that are heavily contested in raids.
5) Your “BiS” Changes If You’re the Assignment Paladin
Real raid life matters:
- Holy Paladins assigned to tank healing value different choices than raid healers.
- Protection Paladins tanking trash/AoE might gear differently than single-target boss tanks.
- Retribution Paladins sometimes trade tiny personal DPS for raid utility consistency (hit reliability, survivability on progression).
Stat Caps and Quick Conversions at Level 70
These numbers help you translate “rating” into results when comparing upgrades:
- Melee Hit Rating: ~15.8 rating = 1% hit at level 70
- Spell Hit Rating: ~12.6 rating = 1% spell hit at level 70
- Defense Rating: ~2.4 rating = 1 defense skill at level 70
Use this as a sanity check when deciding between two items with similar item level.
Holy Paladin BiS (Healer)
Holy Paladin gearing is about one thing: keep your targets alive without running out of mana. Healing power (and later, haste) boosts throughput, while intellect and MP5 support longevity. Your BiS list will also shift slightly depending on whether your guild needs you to spam big tank heals or cover steady raid damage.
Holy Paladin role reminder: You’re a premium tank healer in TBC. You win by being consistent—fast reactions, clean cooldowns, and a mana bar that lasts.
Holy Paladin stat focus (practical):
- Healing power and haste (when available) increase output.
- Intellect increases mana pool and supports crit-based play.
- MP5 smooths long fights and progression nights.
Holy Paladin Pre-Raid BiS (Fresh 70)
Use this list to enter Karazhan/Gruul/Mag smoothly.
- Head: Whitemend Hood — Tailoring
- Neck: Gezzarak’s Fang — Terokkar (Gezzarak the Huntress)
- Shoulders: Primal Mooncloth Shoulders — Tailoring
- Back: Bishop’s Cloak — Badge vendor
- Chest: Primal Mooncloth Robe — Tailoring
- Wrists: Blessed Bracers — Blacksmithing
- Hands: Prismatic Mittens of Mending — The Botanica (Commander Sarannis)
- Waist: Primal Mooncloth Belt — Tailoring
- Legs: Whitemend Pants — Tailoring
- Feet: Boots of the Watchful Heart — Heroic Old Hillsbrad (Captain Skarloc)
- Rings: Band of Halos — Badge vendor; plus Ancestral Band / Ring of Convalescence — Thrallmar/Honor Hold (Revered)
- Trinkets: Essence of the Martyr — Badge vendor; Scarab of the Infinite Cycle — Black Morass (Aeonus)
- Weapon: Hand of Eternity — Blacksmithing
- Off-Hand: Swamplight Lantern — Heroic Slave Pens (Quagmirran)
- Libram: Blessed Book of Nagrand — “The Ultimate Bloodsport” (Nagrand)
Holy Paladin Phase 1 (Tier 4) BiS
- Head: Justicar Diadem — Prince Malchezaar (Karazhan)
- Neck: Shattered Sun Pendant of Restoration — Shattered Sun Offensive (Exalted)
- Shoulders: Justicar Pauldrons — Gruul the Dragonkiller (Gruul’s Lair)
- Back: Sunshower Light Cloak — Karazhan (Chess Event)
- Chest: Justicar Chestpiece — Magtheridon (Magtheridon’s Lair)
- Wrists: Bracers of the Green Fortress — Blacksmithing
- Hands: Prismatic Mittens of Mending — The Botanica (Commander Sarannis)
- Waist: Girdle of the Protector — Nightbane (Karazhan)
- Legs: Justicar Leggings — High King Maulgar (Gruul’s Lair)
- Feet: Boots of Courage Unending — The Curator (Karazhan)
- Rings: Band of Halos — Badge vendor; Violet Signet of the Grand Restorer — The Violet Eye (Exalted)
- Trinkets: Essence of the Martyr — Badge vendor; Scarab of the Infinite Cycle — Black Morass (Aeonus)
- Weapon: Gavel of Pure Light — High King Maulgar (Gruul’s Lair)
- Off-Hand: Aegis of the Vindicator — Magtheridon (Magtheridon’s Lair)
- Libram: Blessed Book of Nagrand — “The Ultimate Bloodsport” (Nagrand)
Holy Paladin Phase 2 (Tier 5) BiS
- Head: Crystalforge Greathelm — Kael’thas Sunstrider (Tempest Keep)
- Neck: Lord Sanguinar’s Claim — Kael’thas Sunstrider (Tempest Keep)
- Shoulders: Crystalforge Pauldrons — Leotheras the Blind (Serpentshrine Cavern)
- Back: Sunshower Light Cloak — Karazhan (Chess Event)
- Chest: Crystalforge Chestpiece — Fathom-Lord Karathress (Serpentshrine Cavern)
- Wrists: Blackfathom Warbands — Lady Vashj (Serpentshrine Cavern)
- Hands: Glorious Gauntlets of Crestfall — Lady Vashj (Serpentshrine Cavern)
- Waist: Girdle of Fallen Stars — Void Reaver (Tempest Keep)
- Legs: Crystalforge Leggings — High Astromancer Solarian (Tempest Keep)
- Feet: Boots of Courage Unending — The Curator (Karazhan)
- Rings: Phoenix-Ring of Rebirth — Kael’thas Sunstrider (Tempest Keep); Naaru Lightwarden’s Band — High King Maulgar (Gruul’s Lair)
- Trinkets: Pendant of the Violet Eye — The Violet Eye; Essence of the Martyr — Badge vendor
- Weapon: Lightfathom Scepter — Lady Vashj (Serpentshrine Cavern)
- Off-Hand: Aegis of the Vindicator — Magtheridon (Magtheridon’s Lair)
- Libram: Blessed Book of Nagrand — “The Ultimate Bloodsport” (Nagrand)
Holy Paladin Phase 3/4 (Hyjal / Black Temple / Zul’Aman) BiS
- Head: Lightbringer Greathelm — Archimonde (Hyjal Summit)
- Neck: Brooch of Nature’s Mercy — Akil’zon (Zul’Aman)
- Shoulders: Lightbringer Pauldrons — Mother Shahraz (Black Temple)
- Back: Shroud of the Highborne — Illidan Stormrage (Black Temple)
- Chest: Lightbringer Chestpiece — Illidan Stormrage (Black Temple)
- Wrists: Blessed Adamantite Bracers — Rage Winterchill (Hyjal Summit)
- Hands: Glorious Gauntlets of Crestfall — Lady Vashj (Serpentshrine Cavern)
- Waist: Girdle of Hope — Azgalor (Hyjal Summit)
- Legs: Lightbringer Leggings — The Illidari Council (Black Temple)
- Feet: Pearl Inlaid Boots — High Warlord Naj’entus (Black Temple)
- Rings: Band of the Eternal Restorer — Scale of the Sands (Exalted); Blessed Band of Karabor — Black Temple trash
- Trinkets: Memento of Tyrande — Illidan Stormrage (Black Temple); Essence of the Martyr — Badge vendor
- Weapon: Crystal Spire of Karabor — Illidan Stormrage (Black Temple)
- Off-Hand: Felstone Bulwark — Supremus (Black Temple)
- Libram: Blessed Book of Nagrand — “The Ultimate Bloodsport” (Nagrand)
Holy Paladin Phase 5 (Sunwell) BiS
- Head: Helm of Burning Righteousness — Sunwell Plateau (Kil’jaeden)
- Neck: Nadina’s Pendant of Purity — Sunwell Plateau (Kalecgos)
- Shoulders: Lightbringer Pauldrons — Mother Shahraz (Black Temple)
- Back: Shroud of Redeemed Souls — Sunwell Plateau (Felmyst)
- Chest: Garments of Serene Shores — Sunwell Plateau (Eredar Twins)
- Wrists: Lightbringer Bracers — Black Temple (Supremus)
- Hands: Sunblessed Gauntlets — Sunwell Plateau (Brutallus)
- Waist: Lightbringer Belt — Black Temple (Teron Gorefiend)
- Legs: Legplates of the Holy Juggernaut — Sunwell Plateau (M’uru)
- Feet: Lightbringer Treads — Hyjal Summit (Archimonde)
- Rings: Band of the Eternal Restorer — Scale of the Sands (Exalted); Ring of Calming Waves — Sunwell Plateau (Eredar Twins)
- Trinkets: Memento of Tyrande — Illidan Stormrage (Black Temple); Essence of the Martyr — Badge vendor
- Weapon: Hammer of Sanctification — Sunwell Plateau (Kil’jaeden)
- Off-Hand: Aegis of Angelic Fortune — Sunwell Plateau (Felmyst)
- Libram: Blessed Book of Nagrand — “The Ultimate Bloodsport” (Nagrand)
Protection Paladin BiS (Tank)
Protection Paladin gearing is a constant balancing act between:
- not dying, and
- generating enough threat to keep mobs glued to you.
The best tanks are boring in the best way: smooth damage intake, predictable cooldowns, and no random crit deaths. Your gear supports that.
Protection Paladin stat focus (practical):
- Become uncrittable for raid bosses as early as possible.
- Stack avoidance + stamina for progression.
- Add spell damage and hit/expertise as you become comfortable on survival.
Protection Paladin Pre-Raid BiS (Fresh 70)
- Head: Helm of the Righteous — The Mechanar (Pathaleon the Calculator)
- Neck: Strength of the Untamed — Cenarion Expedition (Revered)
- Shoulders: Spaulders of the Righteous — The Botanica (Laj)
- Back: Devilshark Cape — The Steamvault (Warlord Kalithresh)
- Chest: Breastplate of the Righteous — The Steamvault (Warlord Kalithresh)
- Wrists: Bracers of Dignity — Heroic Arcatraz (Harbinger Skyriss)
- Hands: Felsteel Gloves — Blacksmithing
- Waist: Girdle of Valorous Deeds — Heroic Black Morass (Aeonus)
- Legs: Timewarden’s Leggings — Keepers of Time (Revered)
- Feet: Boots of the Righteous Path — Heroic Shattered Halls (Warchief Kargath Bladefist)
- Rings: Elementium Band of the Sentry — Arcatraz (Harbinger Skyriss); Andormu’s Tear — “Hero of the Brood” (Tanaris)
- Trinkets: Icon of the Silver Crescent — Badge vendor; Adamantine Figurine — Shadow Labyrinth (Blackheart the Inciter)
- Weapon: Gavel of Unearthed Secrets — Lower City (Exalted)
- Shield: Azure-Shield of Coldarra — Badge vendor
- Libram: Libram of Repentance — Badge vendor
Protection Paladin Phase 1 (Tier 4) BiS
- Head: Justicar Faceguard — Prince Malchezaar (Karazhan)
- Neck: Barbed Choker of Discipline — Maiden of Virtue (Karazhan)
- Shoulders: Justicar Shoulderguards — High King Maulgar (Gruul’s Lair)
- Back: Devilshark Cape — Heroic Steamvault (Warlord Kalithresh)
- Chest: Justicar Chestguard — Magtheridon (Magtheridon’s Lair)
- Wrists: Bracers of Dignity — Heroic Arcatraz (Harbinger Skyriss)
- Hands: Iron Gauntlets of the Maiden — Maiden of Virtue (Karazhan)
- Waist: Crimson Girdle of the Indomitable — Moroes (Karazhan)
- Legs: Justicar Legguards — Gruul the Dragonkiller (Gruul’s Lair)
- Feet: Boots of the Righteous Path — Heroic Shattered Halls (Warchief Kargath Bladefist)
- Rings: Violet Signet of the Great Protector — The Violet Eye (Exalted); A’dal’s Signet of Defense — “The Fall of Magtheridon” (Magtheridon’s Lair)
- Trinkets: Moroes’ Lucky Pocket Watch — Moroes (Karazhan); Icon of the Silver Crescent — Badge vendor
- Weapon: Bloodmaw Magus-Blade — Gruul the Dragonkiller (Gruul’s Lair)
- Shield: Aldori Legacy Defender — Gruul the Dragonkiller (Gruul’s Lair)
- Libram: Libram of Repentance — Badge vendor
Protection Paladin Phase 2 (Tier 5) BiS
- Head: Crystalforge Faceguard — Lady Vashj (Serpentshrine Cavern)
- Neck: The Darkener’s Grasp — Kael’thas Sunstrider (Tempest Keep)
- Shoulders: Justicar Shoulderguards — High King Maulgar (Gruul’s Lair)
- Back: Royal Cloak of the Sunstriders — Kael’thas Sunstrider (Tempest Keep)
- Chest: Justicar Chestguard — Magtheridon (Magtheridon’s Lair)
- Wrists: Wristguards of Determination — Void Reaver (Tempest Keep)
- Hands: Crystalforge Handguards — Leotheras the Blind (Serpentshrine Cavern)
- Waist: Crimson Girdle of the Indomitable — Moroes (Karazhan)
- Legs: Crystalforge Legguards — Fathom-Lord Karathress (Serpentshrine Cavern)
- Feet: Boots of the Resilient — High Astromancer Solarian (Tempest Keep)
- Rings: Seventh Ring of the Tirisfalen — Tempest Keep trash; The Seal of Danzalar — The Lurker Below (Serpentshrine Cavern)
- Trinkets: Moroes’ Lucky Pocket Watch — Moroes (Karazhan); Icon of the Silver Crescent — Badge vendor
- Weapon: Fang of the Leviathan — Leotheras the Blind (Serpentshrine Cavern)
- Shield: Aldori Legacy Defender — Gruul the Dragonkiller (Gruul’s Lair)
- Libram: Libram of Repentance — Badge vendor
Protection Paladin Phase 3/4 (Hyjal / Black Temple / Zul’Aman) BiS
- Head: Faceplate of the Impenetrable — Illidan Stormrage (Black Temple)
- Neck: Vindicator’s Pendant of Dominance — PvP honor reward
- Shoulders: Lightbringer Shoulderguards — Mother Shahraz (Black Temple)
- Back: Royal Cloak of the Sunstriders — Kael’thas Sunstrider (Tempest Keep)
- Chest: Lightbringer Chestguard — Illidan Stormrage (Black Temple)
- Wrists: The Seeker’s Wristguards — Shade of Akama (Black Temple)
- Hands: Lightbringer Handguards — Azgalor (Hyjal Summit)
- Waist: Girdle of Mighty Resolve — Gurtogg Bloodboil (Black Temple)
- Legs: Lightbringer Legguards — The Illidari Council (Black Temple)
- Feet: Tide-stomper’s Greaves — High Warlord Naj’entus (Black Temple)
- Rings: Band of the Eternal Defender — Scale of the Sands (Exalted); Seventh Ring of the Tirisfalen — Tempest Keep trash
- Trinkets: Eye of Magtheridon — Magtheridon (Magtheridon’s Lair); Hex Shrunken Head — Hex Lord Malacrass (Zul’Aman)
- Weapon: Tempest of Chaos — Archimonde (Hyjal Summit)
- Off-Hand: Bulwark of Azzinoth — Illidan Stormrage (Black Temple)
- Libram: Tome of the Lightbringer — Mother Shahraz (Black Temple)
Protection Paladin Phase 5 (Sunwell) BiS
- Head: Helm of Uther’s Resolve — Badge vendor (Isle of Quel’Danas)
- Neck: The Darkener’s Grasp — Kael’thas Sunstrider (Tempest Keep)
- Shoulders: Spaulders of the Thalassian Defender — Badge vendor (Isle of Quel’Danas)
- Back: Slikk’s Cloak of Placation — Badge vendor
- Chest: Heroic Judicator’s Chestguard — M’uru (Sunwell Plateau)
- Wrists: Lightbringer Wristguards — Black Temple (Illidari Council)
- Hands: Lightbringer Handguards — Azgalor (Hyjal Summit)
- Waist: Lightbringer Waistguard — Black Temple (Mother Shahraz)
- Legs: Judicator’s Legguards — Badge vendor (Isle of Quel’Danas)
- Feet: Lightbringer Stompers — Black Temple (Gurtogg Bloodboil)
- Rings: Ring of Hardened Resolve — M’uru (Sunwell Plateau); Ring of Sundered Souls — Morogrim Tidewalker (Serpentshrine Cavern)
- Trinkets: Darkmoon Card: Vengeance — Darkmoon Faire; Hex Shrunken Head — Hex Lord Malacrass (Zul’Aman)
- Weapon: Tempest of Chaos — Archimonde (Hyjal Summit)
- Off-Hand: Sword Breaker’s Bulwark — Felmyst (Sunwell Plateau)
- Libram: Tome of the Lightbringer — Mother Shahraz (Black Temple)
Retribution Paladin BiS (DPS)
Retribution in TBC is all about clean melee fundamentals: don’t miss, don’t get dodged, then scale hard with Strength and haste. A geared Ret becomes a reliable damage dealer with strong utility—especially valuable on progression.
Retribution Paladin stat focus (practical):
- Hit to reliability (stop missing your important attacks).
- Expertise to reduce dodges/parries when relevant.
- Strength and haste to scale your sustained DPS.
Retribution Paladin Pre-Raid BiS (Fresh 70)
- Head: Helm of the Claw — The Steamvault (quest chain)
- Neck: Haramad’s Bargain — The Consortium (Exalted)
- Shoulders: Ragesteel Shoulders — Blacksmithing
- Back: Vengeance Wrap — Tailoring
- Chest: Wastewalker Tunic — Heroic Blood Furnace (Keli’dan the Breaker)
- Wrists: Black Felsteel Bracers — Blacksmithing
- Hands: Flesh Handler’s Gauntlets — “The Flesh Lies…” (Shadowmoon Valley)
- Waist: Red Belt of Battle — Blacksmithing
- Legs: Shattrath Leggings — “Special Delivery to Shattrath City” (Shattrath)
- Feet: Fel Leather Boots — Leatherworking
- Rings: Shaffar’s Band of Brutality — Heroic Mana-Tombs; Shapeshifter’s Signet — Lower City (Exalted)
- Trinkets: Bloodlust Brooch — Badge vendor; Abacus of Violent Odds — The Mechanar (Pathaleon the Calculator)
- Weapon: Lionheart Champion — Blacksmithing (Master Swordsmith)
- Libram: Libram of Avengement — Heroic Blood Furnace (“The Maker”)
Retribution Paladin Phase 1 (Tier 4) BiS
- Head: Justicar Crown — Prince Malchezaar (Karazhan)
- Neck: Choker of Vile Intent — Badge vendor
- Shoulders: Justicar Shoulderplates — Gruul the Dragonkiller (Gruul’s Lair)
- Back: Vengeance Wrap — Tailoring
- Chest: Justicar Breastplate — Magtheridon (Magtheridon’s Lair)
- Wrists: Bladespire Warbands — High King Maulgar (Gruul’s Lair)
- Hands: Grips of Deftness — Karazhan trash
- Waist: Girdle of the Endless Pit — Magtheridon (Magtheridon’s Lair)
- Legs: Justicar Greaves — Gruul the Dragonkiller (Gruul’s Lair)
- Feet: Edgewalker Longboots — Moroes (Karazhan)
- Rings: Ring of a Thousand Marks — Prince Malchezaar (Karazhan); Shapeshifter’s Signet — Lower City (Exalted)
- Trinkets: Abacus of Violent Odds — The Mechanar (Pathaleon); Dragonspine Trophy — Gruul the Dragonkiller (Gruul’s Lair)
- Weapon: Lionheart Champion — Blacksmithing (Master Swordsmith)
- Libram: Libram of Avengement — Heroic Blood Furnace (“The Maker”)
Retribution Paladin Phase 2 (Tier 5) BiS
- Head: Crystalforge War-Helm — Lady Vashj (Serpentshrine Cavern)
- Neck: Pendant of the Perilous — Serpentshrine Cavern trash
- Shoulders: Shoulderpads of the Stranger — Hydross the Unstable (Serpentshrine Cavern)
- Back: Razor-Scale Battlecloak — Morogrim Tidewalker (Serpentshrine Cavern)
- Chest: Crystalforge Breastplate — Kael’thas Sunstrider (Tempest Keep)
- Wrists: Bracers of Eradication — The Lurker Below (Serpentshrine Cavern)
- Hands: Gloves of the Searing Grip — Al’ar (Tempest Keep)
- Waist: Belt of One-Hundred Deaths — Lady Vashj (Serpentshrine Cavern)
- Legs: Leggings of Murderous Intent — Kael’thas Sunstrider (Tempest Keep)
- Feet: Warboots of Obliteration — Morogrim Tidewalker (Serpentshrine Cavern)
- Rings: Band of the Ranger-General — Kael’thas Sunstrider (Tempest Keep); Shapeshifter’s Signet — Lower City (Exalted)
- Trinkets: Tsunami Talisman — Leotheras the Blind (Serpentshrine Cavern); Dragonspine Trophy — Gruul (Gruul’s Lair)
- Weapon: Lionheart Executioner — Blacksmithing (Master Swordsmith)
- Libram: Libram of Avengement — Heroic Blood Furnace (“The Maker”)
Retribution Paladin Phase 3/4 (Hyjal / Black Temple / Zul’Aman) BiS
- Head: Cursed Vision of Sargeras — Illidan Stormrage (Black Temple)
- Neck: Choker of Endless Nightmares — Supremus (Black Temple)
- Shoulders: Shoulderpads of the Stranger — Hydross (Serpentshrine Cavern)
- Back: Cloak of Fiends — Zul’Aman timed chest
- Chest: Lightbringer Breastplate — Illidan Stormrage (Black Temple)
- Wrists: Bindings of Lightning Reflexes — Leatherworking
- Hands: Gloves of the Searing Grip — Al’ar (Tempest Keep)
- Waist: Belt of One-Hundred Deaths — Lady Vashj (Serpentshrine Cavern)
- Legs: Bow-stitched Leggings — Azgalor (Hyjal Summit)
- Feet: Shadowmaster’s Boots — Mother Shahraz (Black Temple)
- Rings: Band of the Eternal Champion — Scale of the Sands (Exalted); Shapeshifter’s Signet — Lower City (Exalted)
- Trinkets: Dragonspine Trophy — Gruul; Berserker’s Call — Zul’jin (Zul’Aman)
- Weapon: Torch of the Damned — Reliquary of the Lost (Black Temple)
- Libram: Libram of Avengement — Heroic Blood Furnace (“The Maker”)
Retribution Paladin Phase 5 (Sunwell) BiS
- Head: Coif of Alleria — Kil’jaeden (Sunwell Plateau)
- Neck: Clutch of Demise — Brutallus (Sunwell Plateau)
- Shoulders: Demontooth Shoulderpads — Badge vendor (Isle of Quel’Danas)
- Back: Cloak of Unforgivable Sin — Kalecgos (Sunwell Plateau)
- Chest: Bladed Chaos Tunic — Eredar Twins (Sunwell Plateau)
- Wrists: Lightbringer Bands — Black Temple (Illidari Council)
- Hands: Gloves of Immortal Dusk — Badge vendor (Isle of Quel’Danas)
- Waist: Lightbringer Girdle — Black Temple (Teron Gorefiend)
- Legs: Leggings of the Immortal Night — Sunwell Plateau (Brutallus)
- Feet: Lightbringer Boots — Hyjal Summit (Rage Winterchill)
- Rings: Band of Ruinous Delight — Sunwell Plateau (Eredar Twins); Hard Khorium Band — Jewelcrafting
- Trinkets: Dragonspine Trophy — Gruul; Shard of Contempt — Magisters’ Terrace (Kael’thas)
- Weapon: Apolyon, the Soul-Render — Kil’jaeden (Sunwell Plateau)
- Libram: Libram of Avengement — Heroic Blood Furnace (“The Maker”)
Fast-Track Farming Plan (Get BiS Faster Without Burning Out)
If You’re Holy
- Secure reliable trinkets early (badge + dungeon/raid options).
- Prioritize weapon + off-hand upgrades when available.
- Target mana stability first for progression nights (int/MP5), then push haste/output.
Quick win farms: badge cloak/ring options, consistent dungeon off-hands, early raid pieces with big healing value.
If You’re Protection
- Hit your survival baseline first (crit immunity goals, stable mitigation).
- Then scale threat with spell damage + hit/expertise.
- Build a second set if needed: threat set vs maximum mitigation set.
Quick win farms: badge shield/libram, dungeon tank staples, early raid trinkets with defensive value.
If You’re Retribution
- Fix your hit problems first (missing feels horrible and tanks your DPS).
- Stack Strength and haste once reliability is handled.
- Prioritize weapon and trinkets—they’re the biggest multipliers.
Quick win farms: crafted weapon routes early, badge trinket options, and the most impactful raid drops your group can realistically farm.
BoostRoom: The Fastest Way to Finish Your Paladin Gear Set
If you’re tired of losing weeks to bad RNG, messy pugs, or slow attunement progress, BoostRoom is built for exactly this grind.
With BoostRoom, you can focus on playing the fun parts of TBC—raiding, arenas, and progression—while experienced teams help you:
- clear key dungeons and heroics efficiently,
- complete difficult raid prerequisites and progression steps,
- target specific upgrades and badge farming routes,
- stabilize your gearing timeline so you’re raid-ready on schedule.
If your goal is a clean Phase-ready Paladin BiS path, BoostRoom turns “eventually” into “done.”
Common Paladin BiS Mistakes (Avoid These Traps)
- Holy mistake: stacking throughput only and going OOM early. If you can’t last the fight, the extra healing power doesn’t matter.
- Protection mistake: chasing threat stats while still taking scary damage spikes. Dead tanks do zero threat.
- Retribution mistake: ignoring hit/expertise and “hoping it’s fine.” Every miss is lost damage and lost consistency.
FAQ
Q: Do I need full BiS to get invited to raids?
No. Most groups care more about whether you’re prepared (enchants, gems, consumables, correct stats) than whether every slot is perfect. Use BiS as a roadmap, not a gate.
Q: Should I gear multiple sets as a Paladin?
If you play Protection seriously, yes—at least a “safer” set and a “threat” set. For Holy, a second set is optional (more regen vs more throughput). For Retribution, one strong DPS set is
usually enough.
Q: What’s the single biggest upgrade slot for Ret Paladin?
Typically weapon and trinkets. A top-end weapon and the right trinkets can outperform several armor upgrades combined.
Q: Why are some older raid pieces still listed in later phases?
Some items are so efficient that they remain competitive (or even best) deep into TBC—especially certain trinkets, rings, and “perfect-stat” pieces.
Q: Is it worth farming badges instead of raids?
Badges are great for filling painful slots and bypassing RNG, but raids still provide many of the strongest items. The best route is usually a combination: raid weekly + badges daily/weekly.
Q: I’m behind the curve—what’s the fastest catch-up path?
Do the highest-efficiency content you can reliably clear (heroics, ZA, accessible raids), spend badges on high-impact slots, and avoid low-drop-rate nightmares unless the upgrade is huge. BoostRoom can also help you skip the slowest parts of the catch-up grind.