Recommended raid setup for early progression
Magtheridon is forgiving on composition if your cube plan is strong. A practical, progression-friendly setup looks like this:
- 1 Main Tank for Magtheridon
- 2–4 Off-Tanks for Channelers (exact number depends on comfort)
- 6–7 Healers (more if your raid is learning and taking avoidable damage)
- Plenty of interrupts (melee kicks + ranged options)
- Warlocks and Hunters are extremely helpful for controlling Burning Abyssals in Phase 1, but you can still win without them if your raid respects control and positioning.
Fire resistance is not the “secret” here. Clean execution is.
Step 1: Name the cubes and lock the map
Cubes are only hard when players can’t identify them instantly. Your raid needs a naming system that works in voice and in chat with zero confusion.
Pick one and never change it mid-raid:
Option A (Door-based, easiest for most raids):
- Entrance-Left Cube
- Entrance-Right Cube
- Back-Left Cube
- Back-Right Cube
- Center Cube
Option B (Compass-based, works if your raid agrees on orientation):
- North / South / East / West / Center
Now do one more thing that saves hours: physically walk the raid to each cube before the first pull and make everyone point at “their” cube. If a clicker can’t find their cube while out of combat, they won’t find it during Blast Nova chaos.
Step 2: Build a cube system that survives real raids (primaries + backups)
A perfect cube plan on paper fails in real life because people die, get knocked, get Conflagration, lag, or panic. A progression plan must be built to survive mistakes.
The fail-safe cube system (recommended for first kills)
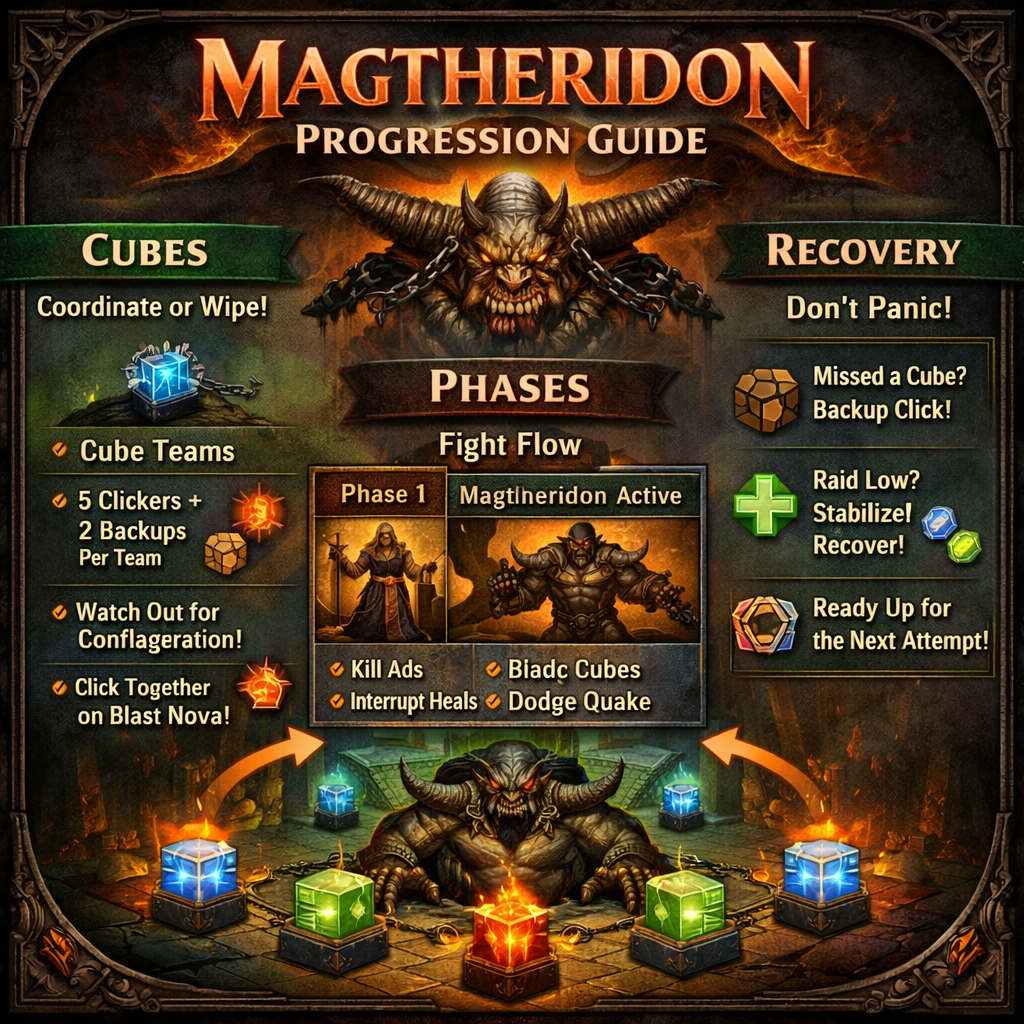
Use 4 cube teams.
Each team has:
- 5 primary clickers (one assigned per cube)
- 2–3 backups (assigned to specific cubes, not “floating backups”)
Yes, that’s a lot of people “assigned.” That’s the point: your first kills are won by redundancy, not by squeezing max DPS out of every body.
Why backups should be assigned to a cube (not just “be ready”)
If a primary fails, your backup has about a heartbeat to save the pull. If the backup must first ask “which cube?” you wipe.
Backups should be written like this:
- “Entrance-Left backup: PlayerName”
- “Back-Right backup: PlayerName”
The one rule that makes backups actually work
Backups must have a clear trigger.
Backup Trigger Rule:
If you do not see your primary begin channeling within one second of the call “NOVA — CLICK”, you click.
This rule prevents the most common wipe: everyone hesitates because they assume someone else will fix it.
Step 3: Choose your callout style (and never improvise)
Cubes fail when callouts are vague (“soon,” “get ready,” “click in a second,” “wait wait wait”). You want one consistent phrase, every time:
“NOVA — CLICK.”
No extra words. No speeches. Just a trigger.
If your raid uses text callouts, use the same phrase every time. Consistency is how players build muscle memory.
Step 4: Understand the cube channel (what it costs and why clickers die)
When a player channels a cube, they take heavy ticking damage during the channel. Some references describe this as roughly hundreds of damage per second (and it feels like it). The practical outcome is what matters:
- Clickers must start the channel healthy
- Healers must treat cube channels like a mini “tank moment”
- Clickers who begin a channel at 40–60% can simply die mid-channel, breaking the chain and wiping the raid
- If all five cubes channel together correctly, Blast Nova is stopped—and Magtheridon typically becomes much more vulnerable, turning the “cage window” into a powerful burn moment
You don’t need clickers with special gear. You need clickers with discipline and healer support.
Phase 1: Hellfire Channelers (0:00–2:00) — win the setup
Phase 1 is where new raids waste the most time because they underestimate it. The boss is still “inactive,” so players act casual, interrupts are sloppy, and Abyssals eat healers. Then Magtheridon wakes up and the raid enters Phase 2 already bleeding.
Your Phase 1 goal is simple:
stabilize tanks, interrupt heals, control Abyssals, and remove enough Channelers that Phase 2 starts clean.
Phase 1 mechanics that matter
Hellfire Channelers bring a small kit that becomes deadly when multiplied by five:
- Dark Mending: a large heal that can undo your kill progress
- Shadow Bolt Volley: raid pressure if Channelers are tanked too close to your group (it has a sizable radius)
- Fear: disruption that breaks healing and tank stability at terrible moments
- Burning Abyssals: additional enemies that spawn and create chaos (especially if uncontrolled)
- Soul Transfer: as Channelers die, the remaining Channelers get stronger—meaning Phase 1 gets harder over time if you are slow or sloppy
The safest Phase 1 tank plan
You can do Phase 1 with different tank counts. The most stable early plan is:
- 3 tanks minimum (4 is very comfortable for learning)
- Split Channelers so no tank is holding “everything”
- Tank Channelers near their starting positions (or at least far apart), so their Volleys don’t blanket your raid
A common progression split:
- Tank A: 2 Channelers
- Tank B: 2 Channelers
- Tank C: 1 Channeler (often the current kill target)
As your kill target dies, Tank C becomes the “floater” who can stabilize the next target or pick up a loose Abyssal.
Interrupt assignments that actually stop Phase 1 spirals
Phase 1 is not a place for “everyone interrupt.” It must be assigned.
For the kill target Channeler:
- 2 interrupters alternating kicks
- 1 backup interrupter covering missed kicks (because Dark Mending and Volley can appear back-to-back)
For non-kill Channelers:
- At least one interrupter watching for Dark Mending
- Or tank them far enough that your raid isn’t eating every Volley, then focus interrupts on the kill target
Priority order (non-negotiable):
- Interrupt Dark Mending
- Interrupt Volleys when possible (especially if the Channeler is too close to raid)
- Stabilize fears with totems/wards where available
If your raid is failing Phase 1, it’s usually because Dark Mending is landing repeatedly and the fight drags long enough for Soul Transfer scaling to overwhelm tanks.
Abyssal control: the real Phase 1 skill
Burning Abyssals are a common reason Phase 1 “randomly” collapses. They spawn, pressure squishy players, and force movement that breaks interrupts and healing.
Progression rule: Control first, kill second.
- Warlocks: banish/fear rotations
- Hunters: traps
- Mages: roots/slow/kite tools
- Anyone: stuns and emergency control
Do not treat Abyssals as a DPS padding target unless control is failing. The fastest Phase 1 is the one where your raid doesn’t panic-move.
Phase 1 kill order (two proven approaches)
Both work. Pick one and commit.
Approach A (most common for new raids):
- Kill 1 Channeler fast
- Kill 2 Channeler fast
- Kill 3 Channeler before 2 minutes if possible
- When Magtheridon wakes up, finish remaining Channelers while the main tank stabilizes the boss
This approach reduces chaos before the boss becomes active while still accepting that not every raid will kill all five in time on early weeks.
Approach B (strong DPS / strong control):
- Kill all five Channelers before Magtheridon activates
- This makes Phase 2 calmer, but only if your interrupts and control are already consistent.
How to prevent the “2-minute wake-up surprise”
Magtheridon becomes active after a set time if Channelers remain. New raids wipe because they’re still clustered, still casting, and the boss immediately threatens non-tanks.
Wake-up positioning rule:
- Main tank moves into ready position early
- Everyone else spreads and keeps distance from the boss’s front
- Healers avoid huge threat spikes at the instant of activation (don’t panic-cast before the tank has control)
If your raid treats activation as a planned phase change, it stops being scary.
Phase 2: Magtheridon active (until 30%) — lock the Nova rhythm
Phase 2 is the real fight: Magtheridon is active, Blast Nova begins, cubes become mandatory, and your raid must maintain spread discipline.
Core Phase 2 abilities (what your raid must respect)
- Blast Nova: a raid-wide lethal channel if not interrupted by cubes
- Quake: periodic raid-wide disruption that interrupts casting and knocks players around (lasting several seconds)
- Conflagration: ground damage zones that punish anyone who tunnels and stands still
- Cleave / frontal danger: non-tanks should never be in front of Magtheridon
The encounter is not complicated; it’s repetitive. Your raid wins by treating each repetition like a drilled routine.
Main tank positioning (anchor the boss)
The cleanest Phase 2 positioning is:
- Tank Magtheridon facing away from the raid
- Tank with back to a wall when possible, so knockback/disruption doesn’t spin the boss
- Keep the boss stable so melee uptime is safe and healers don’t chase a moving target
A spinning boss causes accidental cleaves, cleaves kill clickers, dead clickers cause missed Novas, and missed Novas wipe raids. Stability creates safety.
Raid positioning (spread without isolating heal range)
Spread is mandatory, but spread shouldn’t mean “everyone at maximum range in random corners.”
A practical spread system:
- Ranged and healers form a loose ring
- Everyone keeps a personal bubble (if you can easily bump into someone, you’re too close)
- Clickers stand near their cube with the “one-step rule” (you can step out of a hazard without losing cube access)
The Blast Nova cycle (your raid’s real rotation)
Treat Blast Nova as a raid-wide “mechanic rotation.”
Nova Cycle Script:
- Timer approaches / boss signals
- Caller says: “NOVA — CLICK.”
- Assigned team clicks immediately
- Healers stabilize clickers during the channel
- Cage ends, raid resets to positions
- DPS resumes normal rhythm
If your raid can do this 6–8 times in a row, you win.
How many cube teams do you really need? (and why guides disagree)
Different guides, patches, and server settings have reported different durations for the cube lockout debuff (often called Mind Exhaustion). The safe reality is:
- If your lockout is long, you need more teams.
- If your lockout is short, you can get away with fewer teams.
- If you’re not 100% sure, use the safest plan until you confirm the timing in your own raid.
Progression recommendation: start with 4 teams anyway.
Even if two teams are technically enough on your ruleset, two-team systems wipe to deaths and Conflagration much more often. Your first goal is consistency, not minimal assignments.
What clickers do when Conflagration or Quake hits them
This is where most raids lose pulls.
If you are a clicker and Conflagration lands under you:
- Move out immediately
- Call “backup” if you’re the only one who can reach the cube safely
- Let your backup click if you cannot channel without dying
If you are a clicker and Quake knocks you:
- Re-center to your cube position instantly after Quake ends
- Do not wait until the cast begins to “run back”
The most common “late click” wipe is a clicker who gets displaced, keeps DPSing, and only starts running to the cube when Blast Nova begins. That’s too late.
Healer priorities in Phase 2 (what actually matters)
Healers often wipe raids unintentionally by treating Phase 2 like “heal whoever is lowest” without respecting cubes.
Priority order that wins Phase 2:
- Main tank stability
- Cube clickers during Nova channels
- Raid stabilization (especially avoidable damage victims)
Clickers are not optional. If clickers die, you wipe, and every other healing decision becomes irrelevant.
Practical healer habit:
Before each Nova, top the next team’s clickers.
A clicker starting at 60% is a risk. A clicker starting near full is safe.
DPS threat and timing (how DPS causes “cube wipes” without realizing it)
Magtheridon wipes are blamed on cubes, but many “cube failures” are caused by chaos that DPS created earlier:
- DPS opens too hard before the tank is settled
- Boss turns or melees take hits
- Healers panic-heal and spike threat
- Clickers take extra damage or move unexpectedly
- Cube channel breaks or someone dies
- Blast Nova is not interrupted
DPS rule for clean kills:
- Give the tank a real lead after activation
- Save your biggest cooldown stack for after the first successful Nova cycle when the fight is stable
- Use threat tools proactively, not as an apology after you pull
Your DPS is only valuable if it’s delivered while the raid’s rhythm stays intact.
Phase 3: 30% collapse (30% to death) — win the transition, then keep doing cubes
Phase 3 is where good raids look calm and bad raids fall apart. The reason is simple: at 30%, the room adds two new pressures:
- A large raid-wide hit + brief stun on transition
- Falling debris (“Collapse”) that can kill players who don’t move
The single most important Phase 3 rule
Do not push 30% when Blast Nova is about to happen.
If you push at the wrong time, the stun and chaos desync your clickers, and the next Nova becomes a wipe.
The safest timing script (use it every week):
- At ~35%: raid leader warns “approaching 30, prepare to hold”
- At ~33%: raid leader calls “HOLD at 33”
- Complete a Nova cycle cleanly
- Immediately after the Nova is handled: raid leader calls “PUSH to 30 now”
- Healers pre-top raid and clickers before the push
- After the stun: re-establish spread and cube positions quickly
This one script prevents a huge percentage of first-kill wipes.
What the collapse actually does (why people die instantly)
At 30% the roof crash damages the entire raid and briefly stuns everyone. After that, Collapse effects land during the remainder of the fight and can kill players in a small radius near impact. This is the “avoid standing still” check—especially for players who love finishing casts.
Phase 3 movement rule:
Move early, move small, and never stack.
Don’t sprint across the room unless you must. The goal is to step out of danger and keep your cube access intact.
How clickers survive Phase 3
Clickers often die in Phase 3 because they panic about maintaining cube range and refuse to move out of Collapse or Conflagration.
Clicker survival rules:
- Use the one-step rule: stand in a spot where you can step out of danger and still click
- If Collapse forces you out of range at the worst moment, call it and let your backup take over
- Start each Nova cycle healthy (use personals if healers are disrupted)
- After each Nova, return to your cube zone immediately—don’t wander for extra DPS
Phase 3 kills are won by calm, boring, consistent cube cycles.
How healers win Phase 3 without going OOM
Healers lose Phase 3 because they spend all of Phase 2 fixing avoidable damage. By the time collapse begins, they have no reserves.
Phase 3 healer priorities:
- Tank stability during/after the 30% hit
- Clicker survival during Nova channels
- Raid stabilization (especially players who moved late)
Phase 3 raid habit that saves mana:
Every player uses personal survival tools when needed (healthstones, potions, defensives). If your raid expects healers to carry every mistake, you will run out of mana before the boss dies.
Loot: Tokens, Magtheridon’s Head, and Upgrade Priorities
Magtheridon is one of the best “value per time” raids in early TBC because it’s a single-boss lockout with meaningful rewards. When you make it consistent, it becomes a weekly power injection.
Tier 4 chest tokens (why this kill matters every week)
Magtheridon drops Tier 4 chest tokens (the Chestguard tokens for the three token groups). Chest pieces carry heavy stat weight, and Tier set bonuses often provide massive functional upgrades—threat stability, mana efficiency, healing throughput, or damage consistency depending on class.
If your raid is still learning Tier 4 content, chest token progress is one of the fastest ways to make everything else easier.
Magtheridon’s Head and the ring quest
Magtheridon drops Magtheridon’s Head, which starts the quest “The Fall of Magtheridon.” The reward includes strong ring options, which matters for two reasons:
- Rings are often a stubborn slot to upgrade early
- The quest provides consistent progress even when your drop RNG feels bad
It’s also a “raid culture” reward: finishing the quest is a visible milestone and helps anchor Magtheridon as part of your weekly progression loop.
Upgrade priorities that speed future clears
If your raid is wiping, don’t treat loot like a random prize pool. Use loot to fix wipe causes.
If clickers are dying:
- prioritize survivability upgrades and consistent healing support for clickers
- assign sturdier players to click if needed
If Phase 1 is snowballing:
- prioritize tank stability and healer throughput/mana tools
- phase 1 becomes dramatically easier when tanks can survive Soul Transfer scaling
If Phase 3 is collapsing:
- prioritize healer mana longevity and raid survivability tools
- reduce avoidable damage so healers aren’t drained before 30%
A stable raid clears more bosses, gets more loot, and progresses faster than a raid that “gears DPS first” while fundamentals remain broken.
Extraction: Make Magtheridon a Fast Weekly Kill
Extraction means you stop spending your raid night on avoidable wipes and start turning the lockout into predictable loot. Magtheridon becomes fast when your raid builds routine.
1) Keep the same cube teams every week
This is the biggest “free win.” Cube success is muscle memory.
- Same cube names
- Same clickers
- Same backups
- Same callout phrase
- Same caller
When clickers rotate constantly, your raid stays in “learning mode” forever. When clickers stay consistent, Magtheridon becomes automatic.
2) Treat cube positioning as a between-Nova job
Between Novas, clickers should not drift.
Between-Nova checklist for clickers:
- Return to cube zone early
- Top yourself if needed (bandage/personal heal if available)
- Confirm you are in range and not blocked by hazards
- Be ready to click without moving
Late clicks are almost always “positioning mistakes,” not “reaction mistakes.”
3) Use the cage window for controlled damage, not greedy damage
When cubes succeed, Magtheridon becomes much safer and often more vulnerable. This is your burn window—but only after you secure the channel.
Extraction DPS rule:
Cooldowns come after safety.
A raid that tries to squeeze extra casts before clicking wipes more and kills slower over the full night.
4) Speed up Phase 1 by removing the real bottlenecks
Phase 1 speed comes from three habits:
- Dark Mending never goes off
- Volleys don’t hit the raid because Channelers are tanked sensibly
- Abyssals are controlled instantly so healers don’t have to kite
If Phase 1 is clean, Phase 2 begins stable and your Nova rhythm locks in faster.
5) Time 30% the same way every week
Many raids lose 2–3 attempts per week to the same mistake: pushing 30 at a bad time.
Make it a ritual:
- Hold at 33
- Finish a Nova
- Push immediately after
- Stabilize after stun
- Continue Nova rhythm
The more automatic this becomes, the fewer “random” wipes you experience.
6) Use fast, emotionless wipe recovery
The raid that clears Magtheridon fastest is not the raid that never wipes. It’s the raid that recovers fastest.
After a wipe, do a one-sentence review:
- “Cause: Back-right cube didn’t channel.”
- “Fix: Backup clicks if no channel within one second.”
- Then pull again.
Arguing about who is guilty wastes more time than dying.
Practical Rules: Wipe Causes, Fixes, and Recovery Scripts
This section is designed for raid night. These are the real wipe causes and the exact “do this next pull” fix.
Wipe Cause 1: One cube didn’t channel
Why it happens: clicker out of position, clicker hesitated, clicker got Conflagration/debris, clicker died, or nobody knew the backup.
Fix next pull: enforce the one-second backup trigger, and require clickers to stand near cubes before Nova windows.
Recovery script:
“Same teams. Backups click immediately if no channel on call. Clickers stay in cube range between Novas.”
Wipe Cause 2: Cube channel broke because a clicker died
Why it happens: clicker started low, healers didn’t prioritize clickers, clicker stood in hazard while channeling.
Fix next pull: pre-top clickers before Nova, assign 1–2 healers to watch clickers during channels, clickers use personals if low.
Recovery script:
“Clickers must be healthy before clicking. Healers: clickers are priority during channels.”
Wipe Cause 3: Phase 1 took too long and Soul Transfer scaling overwhelmed tanks
Why it happens: Dark Mending landed, kill target swaps slow, Abyssals caused chaos and interrupts failed.
Fix next pull: double-interrupt the kill target, use a backup interrupter, control Abyssals instantly, commit to one kill order.
Recovery script:
“Dark Mending never lands. CC Abyssals immediately. Hard focus kill target.”
Wipe Cause 4: Shadow Bolt Volley pressure drained healers early
Why it happens: Channelers tanked too close to raid, raid stayed stacked, or tanks dragged mobs through the group.
Fix next pull: tank Channelers where they stand or far apart; keep raid spread and away from Channelers.
Recovery script:
“Tanks hold Channelers away from raid. No dragging through middle.”
Wipe Cause 5: The 30% transition happened right before Nova
Why it happens: DPS tunneled and pushed at random, no hold call, cooldowns forced a push.
Fix next pull: hard rule: hold at ~33%, push right after a Nova.
Recovery script:
“We hold at 33 until after Nova. Push on leader call only.”
Wipe Cause 6: Collapse/debris killed multiple players
Why it happens: stacking, finishing casts in danger, clickers refusing to move.
Fix next pull: spread discipline, move early, clickers use one-step rule, backups cover when clickers must move.
Recovery script:
“Move immediately out of collapse. Don’t stack. Backups cover if hazards force movement.”
Wipe Cause 7: Conflagration dragged through cube zones
Why it happens: panic movement; players ran through clickers; clickers tried to channel in fire.
Fix next pull: move out in small steps, never run through cube clusters, clickers prioritize survival and call backup.
Recovery script:
“Keep cube zones clean. If you get fire, move away from cubes and people.”
Wipe Cause 8: Tank instability caused boss turns and cleave deaths
Why it happens: poor activation control, tank knocked/spun, DPS threat too early, healers forced into panic heals.
Fix next pull: main tank anchors against wall; DPS delays early burst; healers stabilize rather than panic spike.
Recovery script:
“Tank anchors boss. DPS give lead. Threat tools used early, not after pulling.”
Wipe Cause 9: Quake disrupted clickers and they were late returning to cubes
Why it happens: clickers drifted for DPS, didn’t reset position after Quake, or were too far from cube.
Fix next pull: clickers stay near cubes between Novas; after Quake, re-center immediately.
Recovery script:
“Clickers: your job between Novas is being in position.”
Wipe Cause 10: Raid morale collapse after one mistake
Why it happens: blame spiral, long lectures, people stop focusing.
Fix next pull: one-sentence wipe review, same assignments, fast pull timer.
Recovery script:
“One fix, then pull. No debates mid-progression.”
BoostRoom: Smooth Magtheridon Clears With Structured Roles
Magtheridon is the perfect example of a raid that becomes easy with structure and miserable without it. Most groups don’t fail because they lack damage—they fail because cube roles are unclear, backups aren’t trained, Phase 1 interrupts are inconsistent, and the 30% timing is handled like an accident instead of a plan.
BoostRoom is built for players who want reliable progression without wasting lockouts. With organized runs, clear cube assignments, and consistent execution standards, Magtheridon turns into what it should be: a quick weekly raid that fuels Tier 4 chest progress and builds the discipline you need for the next tiers.
If you want more invites, being known as a player who can handle cubes calmly under pressure is one of the fastest reputation upgrades you can earn in TBC Classic raiding—and BoostRoom helps you get there.
FAQ
Do we need fire resistance for Magtheridon?
No. Clean execution (cubes, interrupts, spread, and movement) matters far more than resistance stacking.
How many cube teams should we run for our first kills?
Use 4 teams with assigned backups. It’s the most forgiving plan when your raid is learning, people are dying, or hazards force movement.
Why do guides disagree on Mind Exhaustion duration?
Different patches, versions, and server settings have reported different lockout durations. The safe approach is to assume you need multiple teams, then optimize once your raid confirms the timing on your realm.
What’s the most common reason we wipe?
A missed or broken cube channel during Blast Nova. Fix it with strict cube assignments, a single consistent callout (“NOVA — CLICK”), and backups with a one-second trigger rule.
What should a cube clicker do if Conflagration lands under them right before Nova?
Move out immediately and let your backup click. Dying while channeling is worse than losing a few seconds of DPS uptime.
How do we stop Phase 1 from spiraling?
Interrupt Dark Mending consistently, tank Channelers so Volleys don’t hit the raid, and control Abyssals instantly. Phase 1 becomes hard only when basics are missed.
Should we kill Abyssals or just control them?
On progression, control first and kill only when necessary. Uncontrolled Abyssals cause more wipes than they “deserve” because they break positioning and interrupts.
When should we push 30%?
Hold at ~33%, finish a Blast Nova cycle, then push to 30% immediately after. Never push 30% right before a Nova.
What kills people most in Phase 3?
Standing still in collapse/debris zones, stacking too tightly, and clickers refusing to move because they’re afraid to lose cube range. Use the one-step rule and trust backups.
