Why Woods Is Important in Escape from Tarkov
Woods is important because it teaches core Tarkov skills that many players ignore on smaller maps. It teaches how to navigate by landmarks, how to read long sightlines, how to move through natural cover, how to avoid open terrain, how to plan longer routes, and how to extract without relying on obvious buildings.
Woods teaches survival skills that carry into every outdoor map.
Many early and mid-game tasks can send players to Woods, and several important items can be found there through medical areas, food spawns, Scav locations, camps, stashes, and loose loot. Woods is also connected to boss danger because Shturman is tied to the map. The official Shturman page says he can be found on Woods, and it lists sawmill by the large lake as his main location.
Because of this, Woods can be calm or extremely dangerous depending on where you go. A stash route along the edge can be quiet. A careless walk through sawmill can be deadly. A medical supply run can be profitable. A bad open crossing can end the raid quickly. Woods is not about constant action. It is about choosing where danger is worth it.
The best Woods players are not lucky. They know which areas deserve respect.
Why Beginners Get Lost on Woods
Beginners get lost on Woods because many areas look similar at first. Trees, rocks, hills, roads, fields, cabins, and water can blur together if you do not know the major landmarks. Unlike city maps, Woods does not always give you clear indoor structures to orient yourself.
The biggest Woods beginner problem is not aim. It is orientation.
The solution is to learn landmarks. Important Woods landmarks include sawmill, the big lake, Scav House, Outskirts area, RUAF Roadblock, UN Roadblock, USEC Camp, village areas, mountain landmarks, large powerline or road patterns, bunkers, medical camp areas, and extraction edges. Once these landmarks are familiar, the map becomes much easier to read.
Do not try to learn every tree or rock. Learn large anchors first. When you spawn, identify the nearest anchor. Then check extracts. Then plan a route that moves through recognizable points.
On Woods, landmarks are your compass.
The Best Beginner Mindset for Woods
The best beginner mindset is to treat Woods as a survival and navigation map before treating it as a fight map. You do not need to chase every shot. You do not need to enter sawmill every raid. You do not need to cross every field. You need to know where you are, where you are going, and how you will leave.
A successful Woods raid is built from route control, not random wandering.
Start with simple goals. Learn one extract route. Learn one stash route. Learn one quest route. Learn one safe Scav route. Add more as the map becomes familiar. Woods can feel huge when you try to learn everything at once, but it becomes much easier when you divide it into sections.
If you are new, avoid overloading your raid. Do not enter with three quests, a stash plan, a Shturman hunt, and a full loot route. Choose one main objective. Complete it. Extract.
Woods becomes easier when each raid has one clear job.
How Woods Map Flow Works
Woods has a different flow from maps like Customs. Instead of tight industrial chokepoints, Woods uses natural terrain, long sightlines, roads, lakes, hills, camps, forests, and landmark clusters. Player movement is shaped by spawns, quests, stash paths, sawmill interest, extracts, and safe terrain.
Woods movement is less about hallways and more about terrain.
Many players move along edges, through forest cover, toward quest spots, or into sawmill for boss and loot opportunities. Others move through camps for medical and food loot. Some players use long sightlines to watch common routes. Because of this, danger is not always obvious. A quiet field may be watched. A tree line may hide movement. A road may look safe but expose you from multiple directions.
Good Woods movement means thinking about visibility. Before crossing open ground, ask who could see you. Before walking along a ridge, ask whether you are silhouetted. Before entering a camp, ask whether someone could be holding it from nearby trees.
On Woods, the question is not only where enemies are. It is where enemies could see.
Woods Spawn Strategy
Spawn awareness matters on Woods because early player movement can overlap quickly. Some spawns are near map edges, roads, camps, open terrain, or routes toward sawmill and quests. If you sprint blindly from spawn, you may cross another player’s route early.
Your first Woods decision should be orientation, not sprinting.
When you spawn, identify the nearest landmark. Then check your extracts. Then think about nearby spawn danger. Which direction might other PMCs move? Are you near a quest route? Are you near an open crossing? Are you close to a high-value camp or stash line?
A beginner should avoid rushing directly into the center without understanding the spawn. Sometimes the safest first move is a short reposition into cover, then a route decision. Sometimes moving quickly away from a dangerous spawn is better. The key is knowing why you move.
Woods early deaths often happen because players start running before they know where they are.
Sniping on Woods: What Beginners Should Understand
Woods is often associated with sniping because it has open terrain, hills, rocks, forests, long sightlines, and outdoor routes. But good long-range play on Woods is not about standing in the most obvious high place and waiting forever. It is about sightlines, cover, escape routes, and patience.
A good Woods sniper position lets you see, survive, and leave.
Beginner players often make the mistake of choosing a visible hilltop or exposed rock because it gives a wide view. The problem is that wide view often means wide exposure. If you can see too much, too many areas may also see you. Good positions use partial cover, terrain, trees, shadows, and nearby escape routes.
For in-game Woods combat, think about angles rather than just distance. A strong position watches a specific route, extract approach, camp entrance, or open crossing. A weak position tries to watch everything and ends up exposed.
The best sightline is not the longest sightline. It is the sightline you can survive after using.
Sniping Safety: Avoid Becoming the Target
If you stay in one place too long, other players may notice your shots, movement, or silhouette. Woods has many players who listen for distant shots and rotate carefully. Once you fire, assume your general location may be known.
After shooting on Woods, your position becomes information.
This does not mean you must always move instantly. It means you should think. Did the shot create noise? Could someone track the direction? Are you on a skyline? Are you near an obvious rock or hill? Do you have cover if someone rotates?
A smart Woods player changes position when needed. Move after revealing yourself, especially if the fight is not finished or if you miss. Avoid peeking from the same exposed spot repeatedly. Use terrain to disappear before reappearing from another angle.
On Woods, patience is strong, but staying predictable is dangerous.
Open Fields and Long Sightlines
Open fields are one of the biggest Woods dangers. They look simple, but they can expose you to hills, rocks, tree lines, and distant players. Crossing open ground without a plan is one of the fastest ways to lose a raid.
Never cross open ground on Woods without stamina and a destination.
Before crossing, look for the next cover point. Check likely sightlines. Listen for shots. Make sure you have stamina. Avoid crossing slowly if the area is exposed. If you are overweight or injured, choose a safer route even if it is longer.
Sometimes the best crossing is no crossing. Woods often has alternate routes through trees, dips, rocks, or edges. A longer covered path can be safer than a direct open path.
The shortest route on Woods is often the most visible route.
Using Trees and Terrain Correctly
Trees and terrain are your main protection on Woods, but they are not magic. A bush may hide you, but it may not protect you. A tree can break line of sight, but it may not cover your whole body. A hill can protect you, but it can also silhouette you if you stand on top.
Natural cover works when you understand what it blocks and what it does not.
Move from cover to cover. Use dips in terrain. Avoid walking along the highest ridge when a lower route is available. When you stop, stop near something that breaks line of sight. When you heal, do it behind real cover or terrain, not in the middle of a small bush in an obvious place.
If someone sees you, use terrain to disappear. Do not run in a straight line across an open field. Break line of sight, change direction, and move toward cover.
Woods survival is terrain management.
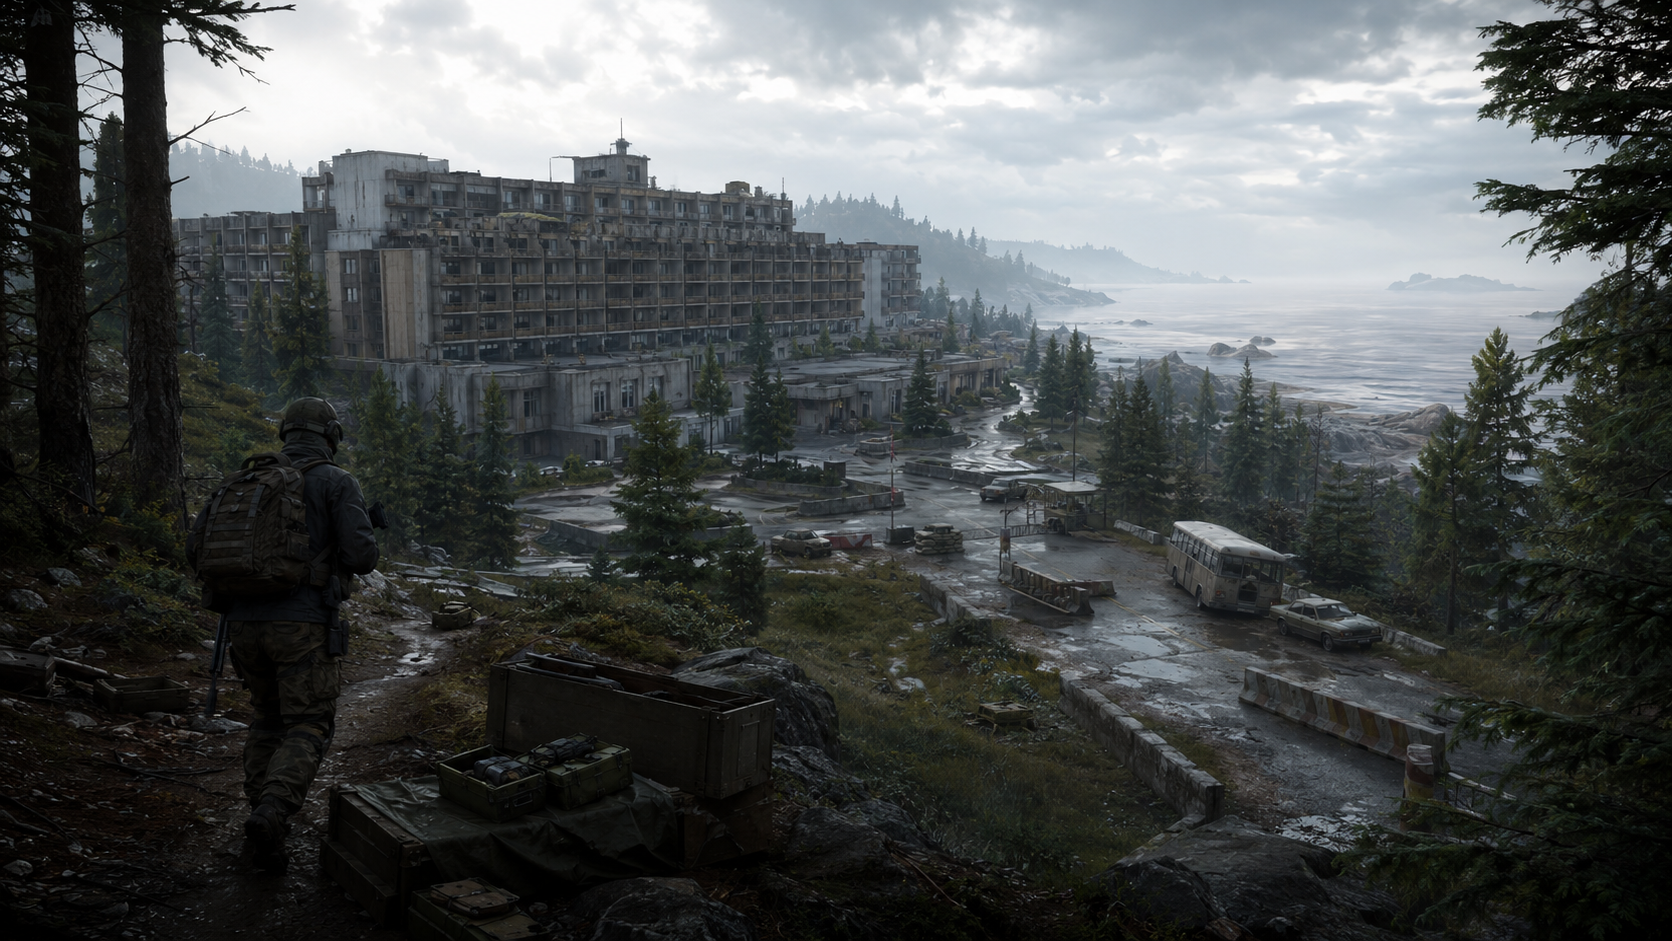
Sawmill: The Central Danger Zone
Sawmill is one of the most dangerous and important areas on Woods. It has valuable loot, quest relevance, open sightlines, player traffic, and boss danger. Shturman and his guards are connected to the sawmill area by the big lake according to the official Shturman wiki page.
Sawmill is not a place to wander through casually.
The area can be watched from multiple directions. Players may approach from tree lines, hills, lake edges, rocks, and nearby routes. Boss activity can make the area even more dangerous. If you hear heavy fighting, long-range shots, or unusual AI behavior near sawmill, slow down and decide whether your goal requires entering.
For beginners, sawmill should be treated as a high-risk zone. If your quest does not require it and your route can avoid it, avoiding sawmill is often smart. If your task does require it, plan the approach, listen carefully, and do not stay longer than needed.
Sawmill rewards confidence and punishes curiosity.
Shturman Danger on Woods
Shturman is the Woods boss and is one of the main reasons sawmill is so dangerous. The official wiki says Shturman can be found on Woods, with his guards spawning at sawmill near the big lake. It also lists several quests connected to eliminating him, including Woods Keeper, Relentless, Hunting Trip, and Hunter.
Shturman changes the entire risk level of sawmill.
Shturman and his guards are dangerous because they can pressure players across distance and punish exposed movement. Tarkov.dev also describes Shturman and his followers as enemies who engage at long range and prefer to keep their distance while protecting the sawmill area.
For beginners, the practical rule is simple: do not enter sawmill without understanding the risk. If you hear repeated powerful shots or see bodies around the area, treat it as dangerous. If you are questing or carrying valuable loot, avoid unnecessary boss contact.
Boss loot is tempting, but survival is worth more than a fight you are not prepared for.
Shturman’s Stash Key and Stash Value
Shturman can be connected to valuable loot opportunities, including Shturman’s stash key. The official bosses page lists Shturman’s stash key among his notable rewards.
Boss-related loot can be valuable, but it comes with heavy risk.
New players should not make Shturman farming their first Woods goal. The sawmill area is dangerous even without the boss, and boss interest attracts experienced players. If you do get boss-related loot or a valuable key, your objective should shift toward extraction.
Do not keep roaming Woods after finding a rare or valuable item. Secure it, choose a safe route, and leave.
A rare item in your stash is progress. A rare item lost in sawmill is only a story.
Hidden Stashes on Woods
Hidden stashes are one of the best reasons to learn Woods. The official Woods interactive map includes caches and other loot markers, making stash routes easier to study and plan.
Hidden stashes turn Woods into a strong money map without forcing constant PvP.
Stash routes are valuable because they reward map knowledge. Many stashes are away from the most obvious hotspots, and they can provide a wide range of loot. They are especially useful for beginners, solo players, and Scav runs because they create profit without requiring high-risk fighting.
The challenge is memorization. Do not try to learn every stash in one day. Learn a short route with a few stashes, then expand. Connect each stash to a landmark, not just a memorized picture. If you can find a stash from a landmark under pressure, you truly know it.
A stash route is only good if you can find it and extract from it consistently.
Best Woods Stash Route Philosophy
The best Woods stash route depends on spawn and extract. A good route should move from your spawn toward your extract while checking stashes along the way. Do not run across the entire map only to hit every stash you know.
A stash route should flow toward extraction, not away from it.
Start with edge routes. Woods edges can be safer than central sawmill routes if you know boundaries, mines, and extracts. Use terrain, trees, and landmarks. Avoid open fields when possible. Check stashes quickly and keep moving.
If your bag becomes valuable, stop extending the route. Extract. Stash routes make money through repeated survival, not through perfect full-map clears.
The best stash run is the one that ends before greed takes over.
Loot Categories Worth Picking Up on Woods
Woods can provide many valuable loot types: food, medical items, technical parts, barter goods, weapons, attachments, ammo, Scav gear, valuables, hidden stash items, and quest items. Its loot is spread across camps, buildings, stashes, Scavs, loose spawns, and containers.
Woods loot is strongest when you combine stashes, camps, and safe extraction.
Prioritize compact value. Medical items, food, electronics, tools, barter goods, keys, useful ammo, and valuable attachments are usually better than bulky low-value gear. If your bag is small, value per slot matters even more.
Woods can also be strong for survival supplies. Food and medical loot can help your raid immediately or support quests and Hideout progression later.
On Woods, practical loot is often better than flashy loot.
Medical Camp and Supply Areas
Medical and supply areas on Woods are useful for meds, food, barter items, and task-related supplies. They can be excellent for beginners who need survival items or early progression materials. However, these areas can also attract players.
Medical loot is valuable because every raid can damage you.
Approach camps carefully. Listen before entering. Avoid standing in the open while searching. Check containers and loose loot quickly. If you find rare medical items or needed quest supplies, extract instead of expanding the raid unnecessarily.
Medical areas can be safer than sawmill, but they are not risk-free. Other players know their value, especially early wipe.
A quiet camp can become dangerous if you loot it like nobody else knows it exists.
USEC Camp and High-Value Camp Routes
USEC Camp is a notable Woods area because it can contain useful loot and is tied to player movement. It is also a place where players can meet unexpectedly because it sits along potential routes and quest paths.
USEC Camp is useful, but it should be approached like a contested area.
Do not sprint into camp without listening. Check from outside first. Watch for players moving through trees or holding nearby cover. Loot quickly and avoid getting trapped between tents, containers, and open approaches.
Camp routes can be profitable, especially when combined with stashes or extraction paths. But like every Woods area, the route matters more than the individual loot stop.
A camp is only profitable if your approach and exit are safe.
Village and Northern Areas
Village-style and northern areas of Woods can provide loot, Scav activity, quest movement, and route options. These areas can feel quieter than sawmill, but they still require awareness. Players may use them for extracts, stashes, food, barter loot, or tasks.
Quiet areas on Woods are not empty areas.
Loot houses, containers, jackets, food spawns, and nearby stashes when safe. Watch for Scavs and player movement. Be careful entering buildings because sound carries and close-range surprises can happen even on an open map.
Northern routes can be excellent for players who want to avoid central sawmill danger, but you still need extracts and landmarks. Do not wander through the north with no plan.
Woods has safer areas, but no area should make you careless.
Woods Quest Strategy
Woods quests should be planned around extracts, terrain, and danger zones. Because the map is large and navigation-heavy, you should know where the quest location is before entering. Guessing mid-raid wastes time and creates risk.
A Woods quest raid should begin with a route, not a hope.
If your quest requires a specific camp, marker, item, elimination, or location, identify the nearest landmarks and likely extracts. Bring required items. Avoid unnecessary sawmill fights unless the quest requires that area. Complete the objective and extract if survival or item status matters.
The Woods interactive map includes quest markers, which can help players connect task locations to extracts and nearby landmarks.
Quest progress on Woods is easier when you know the path before the raid starts.
Early Woods Quests for Beginners
Many players encounter Woods through early progression and quest chains. These tasks can send players toward Scav areas, camps, pickup locations, or landmarks. The challenge is not always the objective itself. The challenge is finding it and leaving safely.
Early Woods quests are navigation tests disguised as tasks.
Beginners should use low-risk kits for early Woods tasks until they understand routes. Bring enough food, water, meds, and a way to handle bleeding. Check extracts first. Avoid central danger unless required.
If a task item is found or planted successfully, extract. Do not turn an early Woods quest into a long loot run across sawmill unless you are confident.
A simple completed quest is better than a complicated failed adventure.
Quest Items and Found-in-Raid Value
Some tasks require items with found-in-raid status. The official wiki states that to avoid Run Through, players need at least 200 EXP in raid or to be in raid for at least 7 minutes before extracting.
Finding a quest item is only half the job. Leaving correctly is the real goal.
If you find a needed item on Woods, stop taking unnecessary risks. Move toward extract. Loot a few safe containers or stay long enough if Run Through status is a concern, but do not chase fights just to make the raid feel bigger.
Found-in-raid items are valuable because they save future time. Protect them.
When Woods gives you a needed item, the map is telling you to leave smart.
Scav Runs on Woods
Woods is a strong Scav map because it has stashes, food, medical loot, Scav areas, camps, and quieter routes. A Scav run lets you learn landmarks and extract routes without risking PMC gear.
A Woods Scav run should be calm, profitable, and educational.
The official Scavs page explains that player Scavs spawn into raids with randomized equipment and their own extraction options. That makes Scav runs useful for learning Woods because you can practice navigation, stash finding, and extraction with less pressure.
Check extracts immediately. Identify your location. Choose a route with nearby stashes, camps, or food/medical loot. Avoid sawmill unless you understand the risk and hear that the area is safe. Extract when your bag has value.
Every Woods Scav run should teach a landmark and bring something home.
Best Woods Scav Loot Strategy
As a Scav, prioritize survival and compact value. Food, meds, barter goods, stash loot, tools, electronics, ammo, and useful gear can all make money. If you find a backpack, use it. If you find valuable items, extract.
Your Scav does not need to fight to make Woods profitable.
Avoid attacking other Scavs randomly because Fence reputation matters for long-term Scav value. Use Scav runs to collect items your PMC needs, especially food, meds, Hideout materials, and quest supplies.
If you loot a body, listen first. Bodies near sawmill or open terrain can be dangerous. Take compact value and leave.
A Woods Scav that extracts often can fund many PMC raids.
Woods Extract Basics
Woods extracts vary by PMC or Scav, spawn, faction, and raid conditions. The official Woods interactive map includes extraction markers, which makes it important for learning routes.
On Woods, extraction knowledge matters because getting lost can cost the whole raid.
At the start of every raid, check your available extracts. Do not rely only on memory of a previous raid. Choose a primary extract and a backup if possible. Then build your movement around landmarks that lead toward those exits.
Because Woods is large and open, you should start moving toward extraction early if your bag has value. Do not wait until the final minutes. A late panic run across open ground is one of the worst Woods situations.
The best extraction path is planned before the backpack is full.
Outskirts Extract
Outskirts is one of the most recognizable Woods extract areas and often serves as a key edge landmark. Many players learn Woods partly through Outskirts because it helps define map direction.
Outskirts is important because it gives players a strong orientation anchor.
Even if Outskirts is not your current extract, knowing where it is helps you understand the map. It connects to Scav House-style routes, edge movement, stash routes, and forest navigation. If Outskirts is your extract, approach carefully and avoid assuming the area is safe.
Late raid, players may move toward extracts with loot, injuries, and limited time. Check the area, listen, and avoid standing exposed.
A known extract still needs a safe approach.
UN Roadblock and RUAF Roadblock Areas
UN Roadblock and RUAF Roadblock are important Woods landmarks and extraction-related areas. They help players orient along map edges and road systems. Learning these areas makes navigation easier.
Roadblock landmarks are useful because they connect roads, extracts, and route direction.
When moving near roadblocks, be aware of open sightlines and possible player movement. Roads can feel safe because they are clear, but clear routes are also visible routes. Use cover along the edges rather than walking carelessly down open roads.
If a roadblock is your extract, approach with time and awareness. If it is only a landmark, use it to confirm direction and continue your route.
Roads help you navigate, but they can also expose you.
ZB Extracts and Bunker Areas
Woods has bunker-style extraction and landmark areas that can help players navigate, loot, or leave depending on availability. Conditional extracts require understanding, so do not rely on a bunker extract without checking your list and knowing its status.
A conditional extract is helpful only when you know it is available.
Bunker areas can also attract players because they are known points on the map. Approach carefully. Listen before entering. Be cautious in close spaces because Woods is usually open, but bunkers can create sudden close-range encounters.
If you are new, learn the location first in low-risk raids or Scav runs. Then start using it confidently.
Woods has wide spaces, but its bunker areas can become tight and dangerous fast.
Mines and Map Boundaries
Woods has dangerous map boundaries and minefield areas that can punish players who wander too far or move without understanding the edge. The Map of Tarkov wiki notes that mines have an activation range and can immediately eliminate players upon detonation unless behind cover.
On Woods, the edge of the map is not always safe just because it is quiet.
Beginners should learn warning signs, boundary markers, and dangerous edge areas. Do not blindly walk beyond signs, fences, or suspicious boundary terrain. If you are lost, use landmarks and roads carefully instead of pushing into unknown edges.
This is especially important in low visibility or night raids. Getting lost near mine boundaries can ruin a raid without any player interaction.
Navigation mistakes can be just as dangerous as enemies on Woods.
Night Woods Strategy
Night Woods can feel safer because visibility is lower and traffic may be different, but it is not automatically easy. Navigation becomes harder, landmarks are less obvious, and players with better visibility setups may have an advantage.
Night Woods helps only if you already know the map.
If you are still lost during daytime, night raids may make the problem worse. Use night Woods for specific quests or quieter routes only when you can identify landmarks confidently. Bring supplies and avoid risky open areas.
Night can help with avoiding some traffic, but it also increases the punishment for poor navigation.
Darkness does not make Woods safe. It makes map knowledge more important.
Solo Woods Strategy
Solo Woods can be excellent because you move quietly and make fast decisions. You can use stashes, edge routes, and terrain to avoid unnecessary fights. But you have no teammate to cover crossings, healing, or looting.
Solo Woods is about route discipline and avoiding fair fights in open terrain.
Choose a route based on spawn and extracts. Avoid sawmill unless required. Use stashes and camps for money. Move through cover. Extract when your bag has value. If you hear a squad, let them pass or rotate.
If you take a long-range fight, change position after revealing yourself. If you are injured, shorten the route and leave.
A solo Woods raid is won by staying hard to find and easy to extract.
Squad Woods Strategy
Squads on Woods can cover more angles, but they also make more noise and are easier to spot. A group moving across open ground can be visible from far away. Communication is essential.
A Woods squad needs spacing, landmarks, and clear callouts.
Do not bunch up in open areas. Do not all stand on the same hill. Call directions using landmarks instead of vague words like “there.” Assign a front player, rear watcher, and navigator if needed. If crossing open ground, move with a shared destination.
Squads should also avoid friendly confusion in forests. Teammates can look like enemies at distance. Call movement, clothing if useful, and position changes.
On Woods, a squad survives by moving like a team, not a cluster.
Common Woods Mistakes Beginners Make
One common mistake is getting lost and then sprinting randomly.
Panic movement on Woods usually makes the problem worse.
Another mistake is crossing open fields without checking sightlines or stamina.
Another mistake is walking into sawmill without understanding Shturman, player traffic, or long-range danger.
Another mistake is ignoring stashes and edge routes. Woods has strong money options outside central danger.
Another mistake is relying on one extract without a backup route.
Another mistake is walking into minefield or boundary danger while lost.
Another mistake is sniping from obvious exposed positions and staying there too long after shooting.
The biggest mistake is treating Woods like an empty forest. Woods may be quiet, but quiet does not mean safe.
How BoostRoom Helps Players Improve on Woods
Woods can be frustrating because many players feel lost, exposed, or unsure where danger is coming from. The map requires landmark knowledge, extraction confidence, stash routes, quest planning, and patience with long sightlines. Without a plan, Woods can feel random. With a plan, it becomes one of the strongest maps for survival and steady profit.
BoostRoom helps players turn Woods from a confusing forest into a clear route system.
For beginners, this can make a major difference. Better Woods knowledge helps with extracts, stashes, quests, Scav runs, sawmill awareness, Shturman danger, sniper sightlines, and safer movement. Instead of wandering until the timer runs low, players can enter with a route, objective, and extraction plan.
BoostRoom is useful for players who struggle with Woods navigation, quest routes, stash money, extraction timing, long-range danger, and map confidence. Tarkov is still punishing, but Woods becomes much easier when every raid has direction.
Better Woods routes mean more extractions, more roubles, and less time lost in the trees.
Beginner Woods Rules You Should Remember
Rule one: learn landmarks first.
Woods becomes easier when sawmill, lake, roadblocks, camps, villages, and extracts feel familiar.
Rule two: check extracts immediately.
Your route should always move toward a possible exit.
Rule three: avoid sawmill until you understand the danger.
Sawmill can involve players, boss danger, and long sightlines.
Rule four: use stashes for safer money.
Hidden stashes are one of the best beginner profit tools on Woods.
Rule five: never cross open ground without stamina.
Open fields can expose you from several directions.
Rule six: move with terrain.
Use trees, hills, dips, rocks, and cover to reduce exposure.
Rule seven: extract when the raid has value.
Do not turn a profitable stash run into a sawmill mistake.
Rule eight: use Scav runs to learn.
Woods Scavs are excellent for landmark practice and low-risk looting.
Best Simple Woods Plan for New Players
A strong beginner Woods plan is simple. Choose one route. Learn the nearest landmarks. Check extracts. Avoid sawmill unless your task requires it. Move through cover. Check a few stashes or camps. Extract when your bag has value or your quest is complete.
The best first Woods route is not the richest route. It is the route you can find and survive.
Use Scav runs to practice navigation. Learn one stash line at a time. Learn how roads connect to extracts. Learn how the big lake and sawmill orient the center. Learn where mine boundaries and dangerous edges are. Add quests once you can move confidently.
After each raid, review one thing. Did you know your spawn? Did you know your extract? Did you cross open ground badly? Did you enter sawmill for no reason? Did you get lost near a boundary? Did you leave when your bag had value?
Woods mastery is built one landmark, one route, and one extraction at a time.
Final Thoughts: Woods Rewards Patience and Direction
Woods is one of the best maps in Escape from Tarkov for players who want to learn survival, map reading, stash routes, long-range awareness, and calm extraction planning. It can feel punishing at first because the map is open and easy to get lost on, but the same openness becomes an advantage once you understand landmarks and routes.
Woods is dangerous when you wander, but profitable when you navigate.
Learn sawmill, lake, roadblocks, camps, villages, stash lines, extraction edges, and dangerous boundaries. Respect Shturman. Avoid open crossings without a plan. Use terrain instead of running through fields. Build stash routes that move toward extracts. Use Scav runs to practice. Extract when your raid has value.
The players who struggle most on Woods are often the ones who treat it like empty space. The players who succeed understand that every hill, tree line, road, and landmark changes visibility and movement.
If you want to improve on Woods, stop trying to memorize the whole forest at once. Learn one route. Survive it. Add another route. Survive again. Over time, Woods changes from confusing to calm, and calm players extract more.
In Escape from Tarkov, Woods rewards the player who knows where they are, where they are going, and when it is time to leave.
FAQ
Is Woods good for beginners in Escape from Tarkov?
Yes. Woods can be good for beginners because it teaches navigation, extracts, stash routes, terrain movement, and survival discipline. It becomes much easier after learning landmarks.
Why do beginners get lost on Woods?
Beginners get lost because many forest areas look similar. The solution is to learn major landmarks such as sawmill, the big lake, camps, roadblocks, villages, and extraction edges.
Is Woods good for loot?
Yes. Woods has strong loot through hidden stashes, medical areas, food spawns, camps, Scavs, loose loot, technical items, and quest-related locations.
Where is Shturman on Woods?
The official wiki says Shturman can be found on Woods at the sawmill near the large lake, along with his guards.
Are hidden stashes worth looting on Woods?
Yes. Hidden stashes are one of the best money methods on Woods because they can provide varied loot while allowing safer routes away from central hotspots.
Is sawmill dangerous on Woods?
Yes. Sawmill is dangerous because it can attract players, contain valuable loot, involve long sightlines, and include Shturman boss danger.
How should I move across open fields on Woods?
Cross open ground only with stamina, a clear destination, and awareness of possible sightlines. Use trees, rocks, hills, and terrain dips whenever possible.