Route: The Aggro Threshold Rule (110% Melee / 130% Ranged)
This one rule explains most “I didn’t even do that much!” moments.
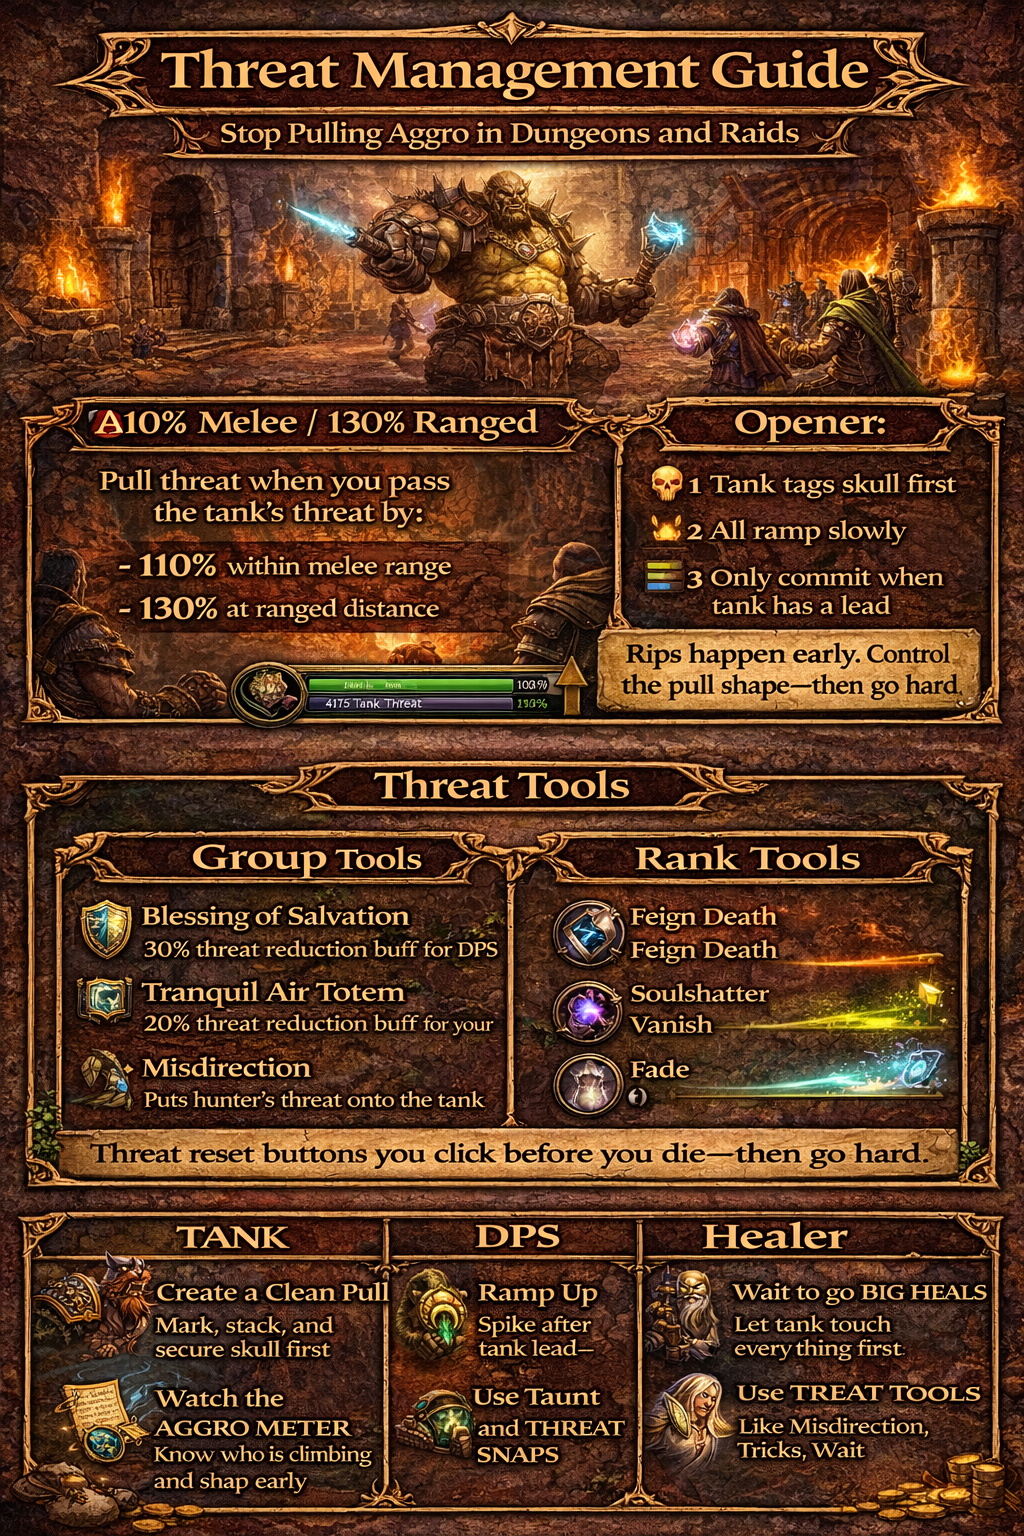
- If you are in melee range of the mob, you pull aggro when your threat exceeds 110% of the current target’s threat.
- If you are outside melee range, you pull aggro when your threat exceeds 130% of the current target’s threat.
Why this matters:
- Ranged DPS can sit “above” the tank on the threat meter longer without pulling, then instantly rip when they cross the 130% line.
- Melee DPS have a tighter leash; crossing 110% is easier, especially during burst windows.
- Once a mob turns, the tank often must exceed those thresholds again to pull it back unless a taunt effect forces the target temporarily.
Practical takeaway: you don’t manage threat at 100%. You manage it at 90–105% depending on your role and distance, because spikes happen.
Route: Why You Pull Aggro Even When You “Waited 2 Seconds”
Most players “wait” in a way that doesn’t help.
Threat problems in TBC are rarely caused by the first global alone. They come from one of these patterns:
- Tank hasn’t established threat on every target yet. You start AoE, hit a mob the tank hasn’t touched, and that mob chooses you.
- Your opener has threat spikes. Big crits, stacked cooldowns, fast DoT application, or multi-hit abilities can jump you from safe to over the threshold instantly.
- Healer starts generating global threat early. If the tank hasn’t tagged the whole pack and the healer casts big early heals, loose mobs drift to the healer.
- You hit the wrong target. If the tank marks skull and you hit X (or a caster in the back), you’re building threat where the tank’s lead is smallest.
- The tank loses uptime. Stuns, knockbacks, silences, line-of-sight, parries/dodges, or a reposition can pause threat for a few seconds. If you keep full output, you catch up.
- You stand at the wrong distance. Ranged players sometimes step into melee range while kiting or repositioning; suddenly the threshold becomes 110% instead of 130%, and the mob snaps.
The fix isn’t “do less damage.” The fix is “open correctly and watch the meter.”
Route: Threat Is a Pull Strategy, Not a Personal Problem
In clean groups, threat is managed as a team:
- The tank controls the pull shape (line-of-sight, marks, pacing).
- DPS follow a threat-safe opener (ramp, then commit).
- Healers delay their biggest heals until the tank has touched everything.
- Utility gets used proactively (Salvation, Tranquil Air Totem, Misdirection, threat drops).
When all four happen, threat becomes boring—and boring is good.
Route: The First 10 Seconds (The Only Part of the Fight That Really Matters for Threat)
Most threat rips happen early because threat is a race until the tank builds a lead. Once the tank is ahead, the buffer makes aggro “sticky.”
Use this universal opener plan:
- Tank tags the pack (or at least the kill target)
- Tank lands 2–3 threat globals on the kill target
- DPS ramps (low-threat setup, DoTs carefully, no full burst)
- DPS commits once the tank has a clear lead
- Healer uses small/efficient heals first and saves big panic heals for after the tank has established threat on the pack
If your group consistently does this, you will feel like threat “got easier,” even with the same gear.
Loot: Tank Threat Foundations (What Good Tanks Do Differently)
Tanks don’t “just hold aggro.” They build and protect threat leads with three habits:
1) They create a clean pull shape
Good tanks avoid chaotic pulls. They:
- line-of-sight caster packs so mobs stack,
- pull to corners so threat abilities hit everything,
- and keep packs tight so cleave and AoE threat actually lands.
2) They front-load threat on the kill target
Your kill target (usually skull) needs a lead first because it will take the most damage fastest.
Common “tank feels weak” moments are really “tank had to spread threat too early.” A great tank:
- secures skull,
- then spreads to the rest.
3) They use taunts and snaps proactively, not reactively
Taunt isn’t only a panic button. It’s a tempo tool. When a DPS is about to cross the threshold, a tank can:
- taunt to force target,
- land a high-threat ability,
- and stabilize the fight.
A tank who saves taunt “for emergencies” is often creating emergencies.
Loot: Tank-by-Tank Threat Identity (Warrior, Paladin, Druid)
Different tanks create threat differently in TBC. Knowing your tank’s identity makes you a smarter DPS/healer.
Warrior tank threat (fast single-target control)
Warriors excel at single-target threat and controlled multi-target with correct positioning and global usage. Their threat can suffer when:
- mobs are spread,
- casters don’t come in,
- or the tank is forced to move constantly.
DPS adjustment:
- Focus skull hard early.
- Don’t free-AoE scattered mobs until they’re stacked and tagged.
Paladin tank threat (strong AoE control when mobs are stacked)
Paladins thrive when mobs are grouped so Consecration-style ground threat and Holy-based threat tools hit everything consistently. Paladins can feel weaker when:
- mobs are pulled out of their ground area,
- casters are left at range,
- or mobs are split across multiple angles.
DPS adjustment:
- Help stack pulls (don’t knock mobs away; don’t chase).
- Give the paladin a moment to establish the “floor” of AoE threat.
Druid (bear) tank threat (sticky, strong physical pressure)
Bears often feel very stable once they have contact and rage flow, but they can struggle when:
- they start pulls rage-starved,
- mobs are spread,
- or casters force them to move and lose hits.
DPS adjustment:
- Respect the first few seconds.
- Avoid pulling extra mobs that the bear hasn’t touched.
Bottom line: your opener should match your tank’s threat style, not just your own rotation.
Loot: DPS Threat Playbook (How to Keep Damage High Without Dying)
Threat control is not “stop DPS.” It’s sequence DPS.
Step 1: Ramp instead of blasting
Ramp means you start with lower-spike actions:
- apply one DoT instead of three,
- build combo points without using your highest burst finisher instantly,
- use a smaller spell rank if your class has strong front-loaded damage,
- or hold your biggest cooldown for 5–10 seconds.
You’re not losing damage; you’re preventing downtime caused by death.
Step 2: Commit when the tank has a lead
Once the tank has a lead, you can open up. But “lead” isn’t a feeling; it’s a number:
- look at your threat meter,
- commit when you’re safely below the threshold.
Step 3: Use threat tools proactively
A threat drop used early is often wasted. A threat tool used at the right moment keeps full uptime.
General timing rule:
- Use threat tools when you hit ~80–95% of the threshold (depending on class and how spiky your next globals are).
Step 4: If you pull aggro, switch from “damage brain” to “survive brain”
When a mob turns:
- stop your highest threat actions,
- use your threat drop if you have one,
- kite toward the tank (not away from the group),
- and avoid dragging the mob into additional packs.
You don’t “win” by proving you can tank it. You win by handing it back cleanly.
Loot: Healer Threat (Why Healers Pull Packs and How to Stop It)
Healer threat is the most misunderstood part of TBC threat management.
Here’s what matters in real runs:
- Healing threat is global to enemies that are aware of you.
- Healing threat is typically half of effective healing (overhealing doesn’t generate the same value).
- On multi-mob pulls, that global threat is split across the mobs that have the healed player on their threat tables.
That split sounds “safe,” but it creates a real dungeon problem:
- If the tank hasn’t tagged a mob yet, your small share might still be enough to put you on top for that mob—so it runs to you.
Healer habits that prevent pulls:
- Delay your biggest heals until the tank has touched everything.
- Use efficient heals and HoTs carefully (especially pre-heals as mobs are moving in).
- Stand where loose mobs path to the tank first (behind/near the tank’s line), not at max range off to the side.
- If something runs to you, bring it to the tank—don’t sprint into the next room.
A healer who understands threat makes dungeons smoother than any extra DPS.
Loot: Threat-Reducing Buffs and Group Tools (The “Easy Mode” Buttons)
Some threat tools are so powerful that not using them is basically choosing to have a harder run.
Blessing of Salvation (30% threat reduction)
If your group has access to it, Salvation is a huge threat smoother for DPS and sometimes for healers in threat-sensitive pulls. It doesn’t fix reckless openers, but it raises your safety ceiling dramatically.
Tranquil Air Totem (20% threat reduction to nearby party members)
This is a strong party tool for smoothing threat, especially for groups that want to go fast without constant aggro rips. It stacks well with other reductions (and stacks multiplicatively with Salvation in common implementations), making it great for spiky DPS.
Misdirection (hunter)
Misdirection is one of the cleanest “threat setup” tools: it lets the hunter start high output while feeding the tank a threat lead. It’s not just for raids; it can make dungeon pulls safer too when used on key packs or when you’re overgeared and your burst is scary.
Threat drops (your personal safety net)
Even with group tools, personal threat drops matter because they let you keep uptime when you’re close to the line.
If your group has these tools available, build them into your default pull routine instead of “saving them for when it’s bad.” If threat is a known risk, prevention is the fastest route.
Loot: Class-by-Class Threat Tools (What to Press and When)
This section is designed so you can read only your class and immediately improve.
Rogue
- Feint: reduces threat by a fixed amount. Best used when you are climbing and your next globals are likely to spike (big crit window, multi-target cleave).
- Vanish: effectively drops you out of danger and can remove you from the threat race; use it when you must stop a death or when you need a full reset to continue uptime safely.
- Practical rogue habit: Feint early enough that it prevents the rip; Vanish only when the rip is already lethal or unavoidable.
Hunter
- Feign Death: drops aggro when it succeeds; it’s your core safety tool.
- Misdirection: front-loads threat onto the tank so you can start damage earlier and harder.
- Practical hunter habit: MD early on scary pulls, Feign when you hit danger levels or after a burst spike.
Warlock
- Soulshatter: reduces your threat significantly (commonly described as a large percentage reduction in TBC-era behavior).
- Practical warlock habit: plan Soulshatter around your damage spikes. If you are about to enter a huge crit/burst window, you want Soulshatter available for the climb afterward.
Mage
- Threat reduction talents: many mage builds include threat reduction for specific schools (notably Arcane Subtlety for Arcane spells).
- Ice Block: can be used defensively to stop death if you rip and are about to be crushed (even if threat behavior depends on implementation, it buys survival time and forces the tank to stabilize).
- Practical mage habit: don’t open with your hardest spike into an unstacked pack; let the tank establish control first.
Priest
- Fade: temporary threat reduction that buys time for the tank to secure mobs or for you to survive add waves.
- Threat reduction talents: Holy/Discipline builds often have threat reduction that makes dungeons significantly safer.
- Practical priest habit: Fade is best when it prevents you from becoming the top target on loose mobs—use it during early chaos or add spawns, not after you’re already dying.
Druid
- Cower (cat): reduces threat (useful for cat DPS who climb too high).
- Bear utility: if you rip aggro, you often have survivability tools, but don’t “become the off-tank” unless that’s the plan—hand the mob back.
- Healer druids: threat reduction talents exist for Restoration spells; they matter in multi-mob dungeons.
- Practical druid habit: if you’re cat and you’re climbing, use threat reduction before you cross the line; if you’re resto, don’t front-load huge heals before the tank has touched everything.
Shaman
- Tranquil Air Totem: party-wide threat reduction in range.
- Earthbind / slows / control: powerful “peel” tools if a mob turns to a healer or caster.
- Practical shaman habit: use Tranquil Air when threat is known to be tight; peel loose mobs toward the tank rather than chasing kills.
Paladin (as DPS/healer in threat-sensitive groups)
- Blessing of Salvation: one of the strongest threat tools you can contribute to group stability.
- Hand-style defensive tools: even when your role is not tanking, your utility can prevent deaths when threat breaks.
- Practical paladin habit: pre-plan Salvation assignments so it’s always on the people who spike hardest.
Warrior (as DPS)
- Stance awareness: threat behavior changes with stance multipliers in many classic-era rule sets; DPS warriors can accidentally climb faster than expected if they front-load burst and cleave into low tank lead.
- Practical warrior habit: don’t open with everything on a target the tank just touched; ramp like everyone else.
Everyone (universal)
- Stopcast / stopattack discipline: stopping one global at the right moment prevents a rip that costs 10 seconds of chaos.
- Target discipline: hit what the tank is building on, especially early.
Extraction: Dungeon Threat Plan (Pull-by-Pull Blueprint That Stops Wipes)
Dungeons are where most players “learn” bad threat habits because pulls are messy and fast. Use this plan to make every pull predictable.
Step 1: Mark and call the kill order
Even basic marks change everything:
- Skull: kill first (tank secures lead here)
- X: kill second
- Moon/Square: crowd control targets (if your group uses them)
If your group refuses marks, at least agree: “hit the tank’s target first.”
Step 2: Stack the pack
Threat is easiest when mobs are stacked:
- line-of-sight casters around a corner,
- pull back to the group,
- don’t knock mobs away unless it prevents a wipe.
Stacking increases tank AoE threat, DPS cleave efficiency, and healer safety.
Step 3: The 3-second rule for DPS
For the first few seconds:
- single-target the kill target,
- avoid multi-dotting everything instantly,
- don’t start full AoE until the tank has established contact on the pack.
This is the exact window where most dungeon aggro rips happen.
Step 4: Use control to protect threat, not just health
When a mob turns:
- stun it,
- slow it,
- fear it carefully (only if it won’t pull more),
- interrupt it,
- and guide it back to the tank.
Control isn’t only “mitigation.” It’s threat recovery.
Step 5: Healer positioning and timing
Healers should:
- stand where loose mobs path through the tank’s space,
- avoid opening with huge heals before the tank has tagged everything,
- and call if they’re being targeted so DPS can peel and the tank can snap.
Step 6: Clean recovery (when the mob is already on a DPS)
If you pull:
- stop your damage spike,
- pop your threat drop if available,
- move toward the tank,
- and do not kite through the healer or into new packs.
The goal is to “return the mob,” not to win a duel.
Extraction: Raid Threat Plan (Pull Timers, Burst Windows, and Threat Resets)
Raids add two threat problems you don’t always feel in dungeons:
- your DPS is higher and more coordinated, so threat spikes are bigger,
- and bosses often have mechanics that disrupt tank uptime (movement, swaps, stuns, knockbacks, add phases).
Use this raid plan to keep threat stable on progression.
1) Use pull timers and staged openers
A staged opener is simple:
- tanks build the first lead,
- DPS ramp for a few globals,
- then cooldowns come out.
If your raid cooldowns on “0 seconds,” you’re choosing to play the tightest threat game possible.
2) Assign threat support before the raid starts
Threat support isn’t “optional nice-to-have.” It’s a raid dps multiplier because it prevents downtime and deaths.
- Decide who gets Salvation if available.
- Decide whether threat-reduction totems are used.
- Decide if hunters are feeding initial threat to the main tank (and on which fights).
3) Treat tank swaps like mini-pulls
Whenever a new tank takes over:
- DPS should soften for a few globals,
- the incoming tank needs time to establish lead,
- and threat drops should be saved for these windows if your spec spikes hard.
Most “random” boss threat deaths happen right after a swap or reposition.
4) Prepare for add waves
Add waves are healer-threat traps:
- heals generate global threat,
- adds may spawn and run toward healers before tanks tag them,
- ranged DPS may hit adds before tanks do.
Solutions:
- tanks pre-position and pre-target,
- DPS hold hard AoE for a moment,
- healers Fade / use threat tools during the spawn chaos,
- and the raid uses stuns/knockbacks to protect healers until tanks stabilize.
5) Build a recovery rule for your raid
Progression raids wipe because one mistake turns into ten mistakes. Create one rule everyone follows:
- If you pull aggro, you call it, you use your drop, and you move to the tank.
- No ego, no improvisation, no running away with the boss.
Extraction: The Best Threat UI Setup (So You Stop Guessing)
Threat control is nearly impossible if you can’t see it.
A progression-friendly threat setup usually includes:
- A threat meter (commonly ThreatClassic2 or Omen-style meters)
- Target-of-target enabled (so you see what the enemy is hitting)
- Clear nameplates or frames showing your target and the tank’s target
- A place on your screen where threat is visible without looking away from mechanics
Where to place your threat meter
Put it near your action bars or near your center-lower vision. If it’s in the far corner, you won’t look until it’s too late.
What to watch on the meter
As DPS, your key moments are:
- early opener (first 10 seconds),
- burst windows,
- after tank swaps,
- when adds spawn,
- when you change targets.
As healer, your key moments are:
- early pulls before the pack is fully tagged,
- add spawns,
- emergency healing spikes,
- times when the tank is CC’d or repositioning.
A simple “threat language” for groups
Even pugs improve with two callouts:
- “Give tank a second”
- “I’m high on threat”
Threat is easier when it’s communicated early, not when someone is already dead.
Extraction: Threat Recovery (What To Do When It’s Already Bad)
Even with perfect openers, threat breaks sometimes—crits happen, resist streaks happen, tanks get stunned, and mobs path weirdly. Recovery is a skill.
If you’re DPS and you pull a boss or elite
- Hit your threat drop (if you have one)
- Stop your highest threat actions for a moment
- Use a defensive if you’re about to be crushed
- Move toward the tank so taunts and snaps land cleanly
- Don’t drag the boss through the raid
If you’re a healer and loose mobs come for you
- Use Fade or your threat tool immediately
- Step toward the tank’s position (don’t run into the open)
- Call it (“loose add on healer”)
- Keep yourself alive with efficient tools while DPS peels
- Once tank tags it, reposition back to safe range
If you’re the tank and you lose a target
- Taunt the highest-lethality target first (the one that will kill someone fastest)
- Use a high-threat ability immediately after taunt to “stick”
- Stabilize skull first, then re-spread
- If you’re in a pack, use positioning to re-stack so AoE threat works
- Communicate: “Stop AoE for 2 globals” if needed
Clean recovery is what separates smooth runs from chaotic wipes.
Practical Rules: Stop Pulling Aggro in Dungeons and Raids
- Threat is per target; don’t assume you’re safe on every mob.
- Melee pulls at 110% threat; ranged pulls at 130% threat.
- Ramp your opener; don’t unload on the first global.
- Hit the tank’s target first—especially skull.
- Don’t AoE until the tank has tagged and stacked the pack.
- If the pack is spread, your AoE is basically a threat lottery.
- Use Salvation/Tranquil Air proactively when threat is tight.
- Save your biggest burst for after the tank’s first threat lead.
- Tank swaps are mini-pulls; ramp again after swaps.
- Add waves are healer-threat traps; tanks tag fast, DPS wait a moment.
- If you pull, threat-drop first, then defensive, then move to tank.
- Don’t kite away from the tank; kite toward the tank.
- Don’t drag mobs through healers or into new packs.
- Healers: don’t front-load huge heals before the tank has touched everything.
- Healers: stand where loose mobs path into the tank’s area.
- Tanks: secure skull, then spread—don’t try to win every mob instantly.
- Tanks: stack pulls; threat is easiest when mobs are clumped.
- Use interrupts and stuns as threat recovery tools, not just “utility.”
- Watch threat during burst windows, not after.
- One “stopcast” global is cheaper than dying.
- Communicate high threat early; don’t wait until you rip.
- If you’re overgeared, threat becomes harder, not easier—because your spikes are bigger.
- Multi-dotting instantly is a common threat throw; stagger DoTs early.
- On messy pulls, single-target is safer than “hero AoE.”
- Threat meters are progression tools—use them like a raid timer.
BoostRoom: Fix Threat Issues Fast and Become Invite-Ready
If you’re tired of dying to aggro, getting blamed for “pulling,” or slowing runs because everyone is scared to press buttons, BoostRoom helps you turn threat into a solved problem.
BoostRoom-style support focuses on practical results:
- Class-specific opener plans that keep your DPS high without ripping
- Threat tool timing (when to Feint, Fade, Soulshatter, Feign Death, or reset)
- Tank/DPS coordination habits that make dungeon pulls clean and fast
- Raid-ready threat pacing for burst phases, tank swaps, and add waves
- UI cleanup so threat is visible and actionable, not a surprise
The goal is simple: you keep uptime, your group stops wiping to aggro, and you become the player people invite because you’re reliable.
FAQ
Why do I pull aggro even when I’m not top threat on the meter?
Because you only pull when you cross the aggro threshold (110% in melee range, 130% outside melee range). You can be close or even slightly above the tank without pulling, then rip instantly when you cross the threshold.
Is threat really that important in TBC raids?
Yes. TBC has real threat limits, especially early in expansions or on fights with tank swaps, movement, or add waves. Good threat control is a raid DPS increase because it prevents deaths and forced downtime.
Should DPS wait longer at the start of every pull?
Not “longer”—smarter. Ramp for a few globals, then commit once the tank has a lead. This keeps your overall damage high and prevents wipes.
What’s the best addon for threat in TBC Classic?
Use a threat meter you actually look at during pulls. Many players use ThreatClassic2 or an Omen-style meter. The best choice is the one that is stable for you and visible in your UI.
How do I stop pulling aggro on AoE packs?
Don’t AoE scattered mobs. Help the tank stack the pack, wait until the tank has tagged the targets, then start AoE. If you AoE early on untagged mobs, you’re gambling.
Do healers generate threat from overhealing?
Healing threat is typically based on effective healing. In practice, huge early heals on multi-mob pulls can still create enough global threat to pull untagged mobs, so timing and positioning matter.
If I pull aggro, should I keep DPSing to “kill it faster”?
Usually no. Your first job is to survive and return the mob to the tank. If you die, your DPS becomes zero and the pull becomes chaos.
