Route: Blade’s Edge in One Sentence (How to Think About the Zone)
Blade’s Edge is a hub-and-ridge zone. You win by doing tight quest clusters on the same elevation and turning in in batches. You lose by bouncing between far ridges for one objective at a time.
Your fastest Blade’s Edge run usually follows this pattern:
- Start south (your faction hub) to build a quest log that stacks.
- Pivot to your “specialty hub” (Alliance: Toshley’s Station; Horde: Mok’Nathal Village) for dense chains.
- Move into mid-zone hubs (Ruuan Weald and Evergrove area) where quests overlap heavily.
- Stop before the time sinks (or postpone them to 70 if they’re clearly built for flying/dailies).
- Exit cleanly into Netherstorm/Shadowmoon as soon as Blade’s Edge quest density starts to thin.
This is exactly what the rest of the page gives you—step-by-step, but flexible enough to handle crowded servers.

Route: Your Progression Goals (What “Done” Looks Like)
If you want Blade’s Edge to feel fast, define “done” in outcomes, not in map completion.
A strong Blade’s Edge finish includes:
- You’re comfortably in the 65–68 band (and usually closer to 67–68 if you’re here for speed).
- Your quest log is not full of half-finished chains scattered across the zone.
- You’ve completed at least two major hub chains that paid off in XP and gear.
- You’ve avoided the classic traps: long cliff travel, repeated backtracking, and level 70-only content that doesn’t help you level.
- You have a clear next step: Netherstorm questing, Shadowmoon questing, or dungeon leveling elsewhere.
A weak Blade’s Edge finish looks like:
- You spent most of your time riding ramps instead of completing objectives.
- You “tasted” five hubs but finished none of them.
- You chased optional chains that require flying or a strong group at a bad time.
- You leave the zone without upgrades and still need another zone to “catch up.”
This guide is built to deliver the strong finish.
Route: Quick Start Setup (First 10 Minutes That Save the Whole Zone)
Blade’s Edge punishes messy setup. Do these first and you immediately feel the zone get easier.
1) Lock your anchor hub
- Alliance often starts anchored at Sylvanaar.
- Horde often starts anchored at Thunderlord Stronghold.
Your anchor hub is where you:
- batch turn-in,
- repair/vendor,
- refill water/ammo/reagents,
- and reset your next loop.
2) Build a “single-direction” quest log
Before you ride out, fill your log with quests that point to the same part of the zone. Blade’s Edge is not a “pick two quests and go” zone—travel costs are too high.
3) Commit to loop play
A Blade’s Edge loop should end with 6–10 completions, then a return/turn-in. If you return with 1–2 completions, you’re bleeding time.
4) Decide your second hub now
- Alliance: plan to pivot into Toshley’s Station early (it’s one of the densest quest packages in the zone).
- Horde: plan to pivot into Mok’Nathal Village early (dense chains, efficient kills, and good flow).
Making this decision early prevents wandering.
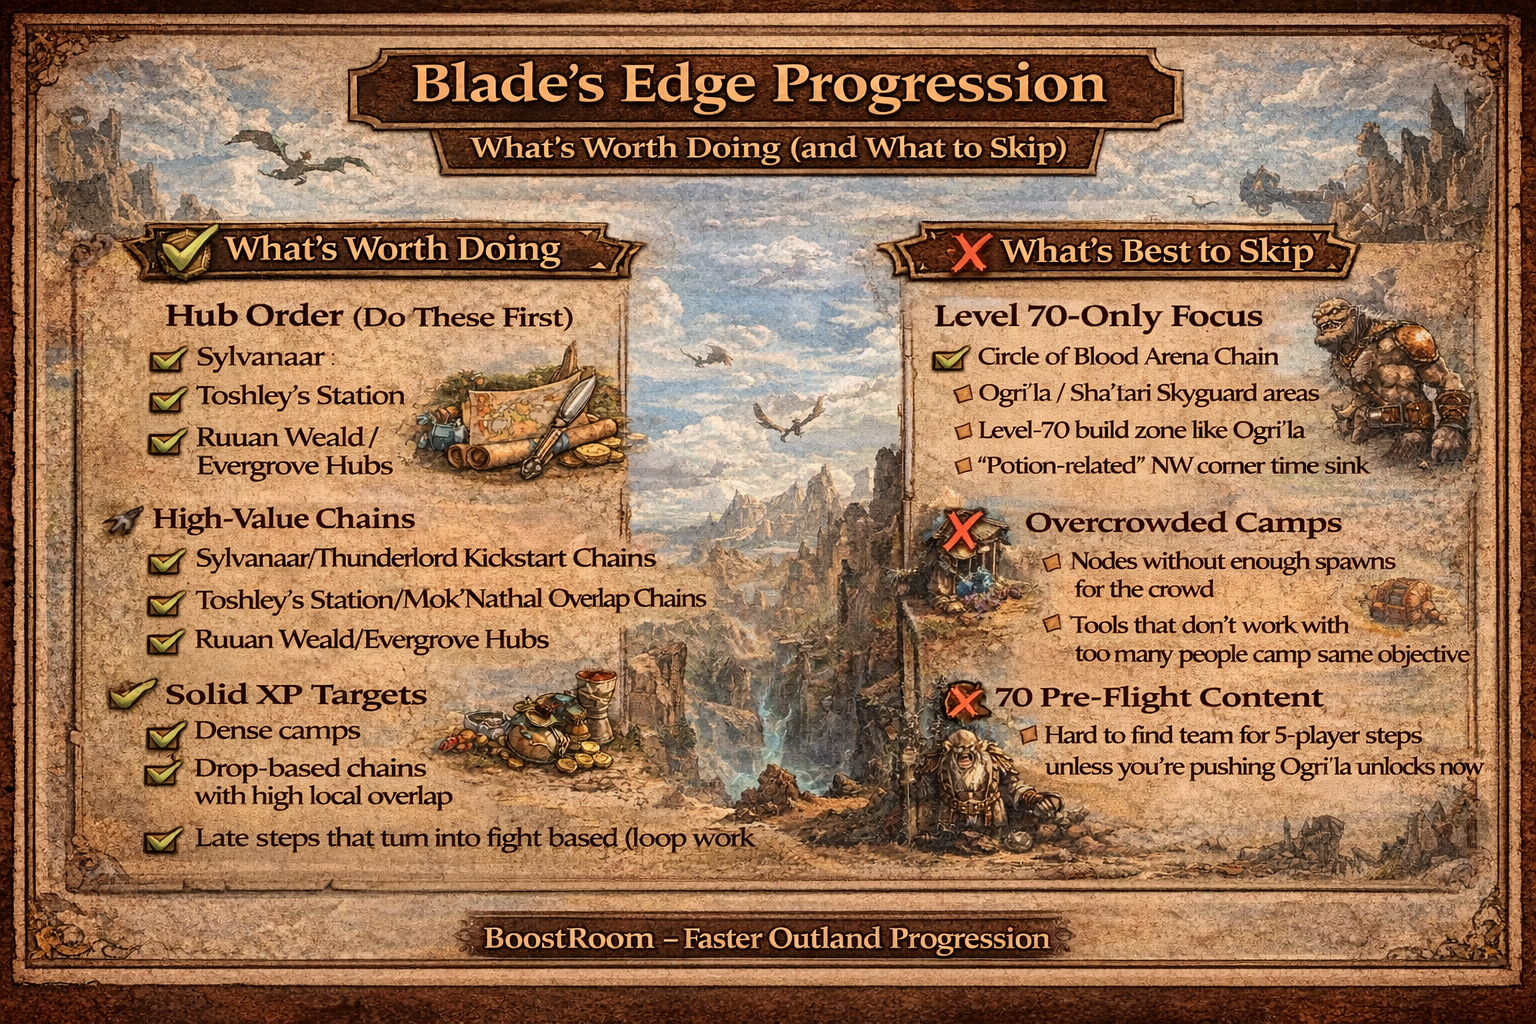
Route: The Best Hub Order (Alliance and Horde)
Alliance hub order (fast, stable, low-waste)
- Sylvanaar (starter density, south routing, and multiple early chains)
- Toshley’s Station (the best “XP engine” hub for Alliance in Blade’s Edge)
- Ruuan Weald / Evergrove area (mid-zone density and some of the best overlap chains)
- Finish with one “clean closer” loop (whichever hub still has yellow quests)
- Exit to Netherstorm/Shadowmoon as soon as Blade’s Edge starts spreading you too thin
Horde hub order (fast, stable, low-waste)
- Thunderlord Stronghold (starter density + access to key chains)
- Mok’Nathal Village (one of the highest value Horde hubs in the zone)
- Ruuan Weald / Evergrove area (neutral chains and dense pockets)
- Optional: complete the “Reunion” style chain steps if you’re already killing ogres
- Exit to Netherstorm/Shadowmoon as soon as the zone starts feeling like travel work
This order minimizes the “cliff tax” and keeps you doing clustered objectives.
Route: What’s Worth Doing (High-Value Chains and Why They’re Fast)
This section is the heart of the page: the content that reliably produces strong XP/hour.
Route: Worth Doing — Sylvanaar (Alliance) / Thunderlord Stronghold (Horde)
These hubs are your southern launchpads. They’re worth doing because they:
- are close to the main travel routes,
- offer early chains that stack naturally,
- and keep you from entering Blade’s Edge “cold” without direction.
Alliance at Sylvanaar (why it’s efficient)
Sylvanaar’s quest package is great because it mixes:
- quick kill quests (dense mob areas),
- a few “clear the area” style objectives,
- and chains that naturally point you toward your next hub (including the breadcrumb that sends you toward Toshley’s Station).
High-value Sylvanaar chains to prioritize
- “starter defense” style quests that keep you in the same pocket (examples include early chains like Marauding Wolves, Protecting Our Own, and A Dire Situation).
- ogre threat chains that set up your future loops (quests that deal with Bloodmaul/Bladespire ogres).
Horde at Thunderlord Stronghold (why it’s efficient)
Thunderlord Stronghold is valuable because it:
- sets up multiple kill pockets close to the hub,
- unlocks chains tied to ogres, drakes, and local threats,
- and naturally routes you toward both Mok’Nathal Village and mid-zone content.
High-value Thunderlord Stronghold chains to prioritize
- the core “encroaching wilderness” style quests that are fast to complete in the nearby area,
- ogre-focused quests that you can stack with other objectives,
- wanted-style targets when they align with your current loop.
The southern-hub rule
Do your southern hub content until:
- your quests start spreading in multiple directions, or
- you’ve unlocked your next dense hub chain.
Then move on. The southern hubs are engines, not destinations.
Route: Worth Doing — Toshley’s Station (Alliance’s Best XP Engine)
If you’re Alliance and you skip Toshley’s Station, Blade’s Edge often feels worse than it should. Toshley’s is loaded with quests that are designed to stack and chain quickly.
Why Toshley’s Station is worth it
- Many quests share the same targets and nearby pockets.
- Several quests are “tool-based” and complete quickly once you understand them.
- The hub naturally leads you toward Ruuan Weald, which is your next best density zone.
The core Toshley chain cluster (the ones that usually pay off fast)
These are the quests that form a clean progression arc:
- Follow the Breadcrumbs → Picking Up Some Power Converters
- Ride the Lightning → Trapping the Light Fantastic → Show Them Gnome Mercy!
- Crystal Clear and Gauging the Resonant Frequency (tight, fast, and usually low travel)
- Ridgespine Menace → More than a Pound of Flesh (simple kill and follow-up flow)
- The “Test Flight” sequence: Test Flight: The Zephyrium Capacitorium → The Singing Ridge → Razaan’s Landing → Ruuan Weald
How to run Toshley’s Station without wasting time
- Pick up everything you can from the hub first.
- Do the nearby objective pockets in a single sweep.
- Treat “Test Flight” quests as a single block—don’t do one, return, do one, return. That’s the slow version.
- Return only when you have multiple turn-ins ready.
When Toshley becomes a trap
Toshley’s is fast when you execute cleanly. It becomes slow if:
- you repeatedly fail or reset the tool-based steps,
- you keep getting interrupted by PvP pressure at the same objective pocket,
- or the area is so crowded you can’t progress.
If that happens, don’t stubbornly fight it—pivot to Sylvanaar cleanups or move into Ruuan Weald earlier.
Route: Worth Doing — Mok’Nathal Village (Horde’s Best XP Engine)
Mok’Nathal Village is the Horde version of “this hub makes Blade’s Edge worth it.” It has multiple stacked chains that keep you in high-density pockets.
Why Mok’Nathal Village is worth it
- Strong chain structure: complete one quest and unlock a whole set of follow-ups.
- Objectives tend to cluster in reachable pockets (less backtracking than you’d expect from Blade’s Edge).
- The hub helps set your mid-zone direction and stabilizes your leveling pace.
High-value Mok’Nathal chains
- The Stones of Vekh’nir → Trial and Error → Ruuan Weald (excellent flow and positioning)
- Unlock chain from Leoroxx: Understanding the Mok’Nathal → Since Time Forgotten… → Slay the Brood Mother
- Spiritcaller chain: The Totems of My Enemy → Spirit Calling → Gather the Orbs → Inform Leoroxx! → There Can Be Only One Response
- Side quests that are often fast because they stack with your travel: Mok’Nathal Treats, The Softest Wings, and Silkwing Cocoons
How to run Mok’Nathal Village fast
- Do the unlock-trigger quest first (The Stones of Vekh’nir) because it opens multiple follow-ups.
- Run one clean loop per pocket. Mok’Nathal is at its best when you complete each objective area fully before returning.
- Don’t overstay once the remaining quests start pulling you into awkward cliff routes—pivot into Ruuan Weald next.
Route: Worth Doing — Ruuan Weald and the Evergrove Area (Mid-Zone Density)
Ruuan Weald and the surrounding mid-zone hubs are where Blade’s Edge stops being “south hub + specialty hub” and becomes “real progression.”
Why Ruuan Weald is worth it
- Multiple overlapping chains: demons, wyrmcult, arakkoa, and local objectives that can be stacked.
- Drop-started quests that turn random kills into bonus XP.
- The area naturally sets up your exit breadcrumbs into Netherstorm and Shadowmoon Valley later.
High-value Ruuan Weald quest clusters
- Faradrella’s demon-focused quest and the mask chain: Culling the Wild can lead into a multi-step sequence (mask-related quests) that stays compact and rewards good XP for time invested.
- Tree Warden Chawn’s chain: starts with A Time for Negotiation… and continues through multiple steps involving wyrmcult targets (very efficient if you do it as one block).
- Drop-based starter: Did You Get The Note? style steps can appear while you’re already killing in the area—treat these as bonus value, not as detours.
Arakkoa pocket value
The Grishna arakkoa-related quests (such as Whispers of the Raven God and the orb-trigger chain like The Truth Unorbed) are worth doing when:
- you have multiple objectives in the same arakkoa pocket,
- and you can maintain kill density without long searching.
The neutral hub approach
Ruuan Weald shines when you run it like a neutral quest hub, even if you’re faction-focused:
- do one full demon loop,
- then one wyrmcult/dragon loop,
- then one arakkoa loop,
- and turn in everything in a big cash-out.
That’s how you make the area feel fast.
Route: Worth Doing — The Gronn Threat and Baron Sablemane (Huge XP If You Stop at the Right Time)
Blade’s Edge has a famous chain arc involving gronn and Baron Sablemane. It’s worth doing because it’s structured, story-driven, and can pay off well—but it also includes steps that can become slow or group-dependent.
The Gronn Threat chain structure (why it’s valuable)
This chain starts in Ruuan Weald and includes a sequence of quests such as:
- A Date with Dorgok
- Favor of the Gronn
- Pay the Baron a Visit
- Into the Churning Gulch
- Goodnight, Gronn
- It’s a Trap!
- Gorgrom the Dragon-Eater
- and later steps involving Baron Sablemane and Gruul’s Lair context (which can become higher friction).
How to do this chain for speed
- Do the early and mid steps while they stay in clustered pockets and your travel stays reasonable.
- If a step becomes a group bottleneck (or sends you into a high-competition camp that kills your pace), pause the chain and return later—especially if you can replace that time with easier yellow quests.
The key speed decision
Many players waste time trying to “finish the whole story right now.” Speed-leveling Blade’s Edge requires a different approach:
- Finish the chain steps that are efficient and solo-friendly.
- Postpone the high-friction steps until you have a group, your level is higher, or you’re returning for other reasons.
This single decision saves hours over the course of the zone.
Route: What to Skip (The Biggest Blade’s Edge Time Sinks)
Blade’s Edge doesn’t slow you down because it lacks quests. It slows you down because certain quests create high travel, low payout patterns.
Here’s what’s commonly not worth doing while leveling—unless your specific situation makes it easy.
Route: Skip — Level 70-Only Content (Even If It’s Tempting)
Blade’s Edge contains content tied to level 70 systems and flying-based daily hubs.
Circle of Blood Arena
The Blade’s Edge “arena” content (Circle of Blood Arena) is built with a minimum level expectation. If you’re leveling, treat it as “not now.” It’s not a leveling engine in the same way as Nagrand’s famous arena chain.
Sha’tari Skyguard and Ogri’la hubs
These factions and their daily hubs are well-known, but they are not designed to be your leveling focus:
- They’re tied heavily to level 70 progression and (in practice) flying access.
- They’re excellent later, but most of their “real value” is after you’re done leveling.
If you’re here to hit 68+ efficiently, postpone them.
Route: Skip — Mog’dorg / Ogri’la Prerequisite Chains (Unless You’re Prepping for 70 on Purpose)
Blade’s Edge includes a quest chain that leads toward Ogri’la access, often starting from Shattrath and pointing you toward Mog’dorg the Wizened near the Circle of Blood area.
This chain includes multiple group-oriented steps (often tagged as group-of-5 difficulty in many references) and is usually best treated as:
- Not a leveling priority, and
- A level 70 prep project if you already know you want those dailies and rewards.
If your goal is leveling speed, don’t let this chain hijack your route.
Route: Skip — Single-Objective Cliff Runs
Blade’s Edge has quests that look simple on paper but cost you a ton in “cliff tax.” The pattern looks like:
- ride up a ramp for one objective,
- ride back down,
- then ride up another ramp for one objective,
- then ride back down again.
The rule
If a quest is going to force you to change elevation twice for one completion, it’s usually not worth it unless it’s a major chain unlock or it overlaps with two other objectives on that same ridge.
Route: Skip — Overcrowded, Low-Spawn Bottlenecks
Some Blade’s Edge objectives become nightmares when:
- too many players are in the same pocket,
- the spawn rate can’t keep up,
- and you’re competing for a few specific mobs or items.
When that happens, the fastest play is not “try harder.” The fastest play is:
- pivot to another hub chain,
- do a different loop,
- or shift your session toward Ruuan Weald where kills are more plentiful.
Blade’s Edge rewards flexibility more than stubbornness.
Route: Skip — Tool-Based Quests If You’re Failing Them Repeatedly
Tool-based quests (especially in Toshley’s Station content) can be extremely fast when executed correctly—but they become time sinks if you:
- repeatedly fail the mechanic,
- lose time resetting,
- or can’t complete it due to chaos in the area.
The speed-friendly solution
Give yourself one reset budget:
- If you fail it once, try again immediately.
- If you fail again, skip it for now and keep your leveling momentum.
You can always return later if you still want completion.
Route: Skip — “Finish Every Hub” Mentality
Blade’s Edge is a zone where finishing everything is rarely optimal. The terrain is too expensive. The faster approach is:
- fully complete the densest hubs,
- partially complete the medium hubs,
- and ignore scattered leftovers that create cross-zone rides for single turn-ins.
If you want completion for fun or gold later, do it at 70 when you have more power and mobility.
Route: The Fast Loops (Concrete Loop Templates You Can Follow)
These loop templates are designed to be easy to follow without memorizing every quest name. They keep you on one elevation band at a time and minimize backtracking.
Route: Loop Template A (South Hub Loop — 45 to 70 Minutes)
Start: Sylvanaar (Alliance) or Thunderlord Stronghold (Horde)
Goal: build your initial quest stack and unlock your next hub pivot
How to run it
- Pick up all quests that point to the nearest pockets first.
- Clear one pocket fully.
- Clear the next closest pocket.
- Return with multiple completions, turn in, and immediately accept follow-ups.
Stop when
- your next objectives split in opposite directions,
- or the next step is clearly pushing you into the Toshley/Mok’Nathal pivot anyway.
Route: Loop Template B (Alliance Pivot Loop — Toshley’s Station Block)
Start: Toshley’s Station
Goal: convert Toshley’s dense chains into a big XP burst and unlock Ruuan Weald flow
How to run it
- Take the entire quest package first.
- Do nearby collection/kill objectives in one sweep.
- Do the “Test Flight” chain as a single block if you’re comfortable with it.
- Return for a big batch turn-in.
- Immediately take the breadcrumb that points you toward Ruuan Weald when you’re ready.
Stop when
- remaining quests are low value and scattered, or
- you’re ready to transition into mid-zone density.
Route: Loop Template C (Horde Pivot Loop — Mok’Nathal Village Block)
Start: Mok’Nathal Village
Goal: use unlock chains to open multiple follow-ups and complete them in pocket sweeps
How to run it
- Complete the unlock-trigger quest first (it opens multiple chains).
- Do the “story + spirit” sequence in a compact loop style:
- one pocket for stones/objects,
- one pocket for kill objectives,
- one pocket for follow-up collection/ritual steps.
- Return only when you can cash out 6–10 turn-ins.
Stop when
- the remaining quests push you into heavy elevation travel with minimal overlap,
- or you’re ready to transition into Ruuan Weald.
Route: Loop Template D (Mid-Zone Density Loop — Ruuan Weald / Evergrove Area)
Start: Ruuan Weald area
Goal: stack demon, wyrmcult, and arakkoa pockets into one high-density session
How to run it
- Choose two pocket types that are close together (example: demons + wyrmcult).
- Complete both fully.
- Pick up any drop-started quests that naturally appear while you’re farming.
- Return for a huge batch turn-in.
- Then choose a third pocket type (example: arakkoa) and do it as a separate loop.
Stop when
- quests go green,
- remaining objectives become single-target errands,
- or you’re already 67–68 and Netherstorm/Shadowmoon is calling.
Route: Alternative Paths If You Hate Blade’s Edge (Yes, Skipping Can Be Smart)
Some players simply don’t enjoy Blade’s Edge terrain. If that’s you, the progression-friendly alternative is not “suffer through it.” It’s choosing a better XP engine.
If you’re already 67+
You can often pivot to:
- Netherstorm for dense late-60s questing, or
- Shadowmoon Valley if you prefer that story and pacing.
If you’re mid-60s and still need XP
Consider:
- finishing Nagrand’s best chains (especially if you skipped group content there),
- running high-value dungeons (if your group is stable),
- or completing Terokkar’s late chains if they’re still yellow for you.
Blade’s Edge is not mandatory. It’s a tool. Use it when it’s efficient.
Loot: What’s Worth Caring About (Leveling Speed Gear, Not Collection Gear)
Blade’s Edge rewards can be great, but only if you prioritize upgrades that improve leveling speed.
Loot: The Leveling Upgrade Priority (Works for Every Class)
1) Main damage upgrades
- weapons for melee and hunters,
- spell power upgrades for casters,
- anything that reduces the number of globals/casts per kill.
2) Survivability upgrades that prevent deaths
- stamina and armor (especially for tanks and solo melee),
- defensive pieces that reduce spike damage,
- anything that stops you from corpse-running (the slowest XP mechanic in the game).
3) Sustain upgrades that reduce downtime
- mana longevity for casters/healers,
- regen effects that reduce drinking frequency,
- pieces that keep your pace steady rather than bursty.
4) Everything else
If an item doesn’t make you kill faster, die less, or stop less, it’s usually not a leveling priority.
Loot: Where Blade’s Edge Upgrades Actually Come From
Quest chain rewards
Blade’s Edge has multiple long chains (Toshley’s Station, Mok’Nathal Village, and the Ruuan Weald arcs) that end in meaningful rewards. The real value is that these rewards are:
- predictable,
- role-appropriate in many cases,
- and obtained while you’re earning good XP anyway.
Dense mob pockets
Humanoid and ogre pockets can also give you:
- cloth for bandages or gold,
- steady vendor trash,
- and random green upgrades that patch weak slots.
What Blade’s Edge does NOT give you
Blade’s Edge is not a “dungeon loot zone” because it doesn’t have a standard 5-player dungeon inside the zone the way Terokkar or Zangarmarsh does. Treat this as a questing and chain-reward zone.
Loot: Role-Based Priorities (Quick and Practical)
Tanks
- Stamina and armor keep pulls safe and reduce downtime.
- Threat stability makes questing with a partner (or group farming) faster.
- If you’re doing group quests, survivability upgrades matter more than small DPS bumps.
Healers
- Mana longevity is your speed.
- Take upgrades that let you heal more without drinking.
- Keep a small solo set (even if it’s not perfect) so your questing between group sessions doesn’t feel slow.
Melee DPS
- Weapon upgrades are your biggest multiplier.
- Don’t waste time chasing tiny upgrades if your weapon is outdated—fix the weapon first.
- If you’re dying or bandaging constantly, survivability is a speed stat.
Hunters
- Weapon upgrades and consistency upgrades matter most.
- Pet survivability and reduced downtime keep your pace smooth.
- Avoid risky chain pulls in cliff pockets—death runs are extra punishing in Blade’s Edge.
Caster DPS
- Spell power reduces casts per kill.
- Intellect/regen reduces drinking.
- If your leveling feels slow, your real goal is often “fewer drinks,” not “bigger crits.”
Extraction: End Each Session So Your Next Login Starts Fast
Blade’s Edge has the highest “lost time between sessions” risk in Outland, because it’s easy to log out on a random ridge and spend 10 minutes reorienting.
Extraction: The Blade’s Edge Checklist (Do This Before You Log Off)
- Repair and vendor. Blade’s Edge travel is expensive; don’t add extra trips.
- Clear bag space so you can complete long loops without returning early.
- Refill essentials (water, ammo, reagents, basic consumables you actually use).
- Set your hearthstone to your current anchor hub:
- Sylvanaar/Thunderlord Stronghold if you’re finishing southern loops,
- Toshley’s/Mok’Nathal if you’re mid-chain,
- or a central hub if you’re transitioning to a new area next session.
- Park your character at the start of the next loop, not at the end of the last one.
- Clean your quest log:
- keep quests that share geography with your next loop,
- drop single-objective errands that will force cliff travel.
Extraction: The One-Sentence Plan (The Real Speed Hack)
Before you log out, know your next action in one sentence:
- “Next session: finish Toshley’s block, then shift to Ruuan Weald demon loop.”
- “Next session: complete Mok’Nathal spirit chain, then cash out and move to Evergrove.”
If you log in without a plan, you’ll spend time deciding. Decision time is invisible travel time.
Practical Rules: How to Make Blade’s Edge Feel Easy (Even If You Usually Hate It)
- Batch turn-ins only. If you’re returning for one quest, it’s usually wrong.
- Stay on one elevation band per loop. Don’t “up-down-up-down” in the same run.
- When crowded, pivot immediately. Blade’s Edge has enough pockets to avoid bottlenecks.
- Tool quests are fast only when executed cleanly. Use a two-try rule, then move on.
- Don’t chase level 70 factions while leveling. Save Ogri’la and Skyguard for the right time.
- Don’t force group-style chains without a group. Pause them and keep leveling.
- If your quests go green, exit. Netherstorm/Shadowmoon will be better value.
- Convert travel into profit: kill along your route, loot everything, vendor often.
- Use your hearthstone like a cooldown. Hearth back for big turn-in batches, not small ones.
- Treat Blade’s Edge as a bridge zone: get value, then move forward.
BoostRoom: Turn Blade’s Edge Into Pure Progress (No Cliff Pain, No Bottlenecks)
Blade’s Edge is where players lose time to the same problems:
- overcrowded pockets that stall quest items,
- high-travel chains that become exhausting,
- group-dependent steps that are hard to organize,
- and wasted sessions caused by “I logged in, but I can’t progress right now.”
BoostRoom helps you keep Blade’s Edge progression smooth and fast:
- Support for high-friction chain steps so you don’t get stuck mid-story
- Help with group-style objectives when forming parties is slow or unreliable
- Efficient routing assistance (so you do the right hubs in the right order)
- A hybrid approach that keeps the fun questing while removing the worst time sinks
If you want Blade’s Edge to be a clean stepping stone to 68+ (instead of a cliff marathon), BoostRoom is the shortcut that protects your time and your momentum.
FAQ
When should I start Blade’s Edge Mountains in TBC Classic?
Most players enter during the mid-to-late 60s and treat it as a 65–68 zone. If you’re already 67+, you can be very selective and do only the best hubs and chains.
Is Blade’s Edge worth doing, or should I skip it?
It’s worth doing if you follow hub order and loops. If you hate the terrain or everything is crowded, skipping to Netherstorm/Shadowmoon (or finishing Nagrand/Terokkar content) can be smarter.
What are the best hubs for fast XP?
Alliance: Sylvanaar → Toshley’s Station → Ruuan Weald area.
Horde: Thunderlord Stronghold → Mok’Nathal Village → Ruuan Weald area.
What’s the biggest time-waster in Blade’s Edge?
Cliff travel for single objectives. The zone becomes fast when you complete pockets fully and turn in in batches.
Should I do the Ogri’la or Sha’tari Skyguard content while leveling?
Usually no. Those systems are tied heavily to level 70 progression and commonly require flying access to feel efficient. They’re great later, but they can hijack your leveling route now.
Are Toshley’s Station “Test Flight” quests worth doing?
They can be very efficient if you execute them cleanly and do them as a block. If you keep failing them or the area is too chaotic, skip and move your loop elsewhere.
What if I keep getting stuck on ramps and elevation?
Run one elevation band per loop. Don’t mix lower-valley objectives with upper-ridge objectives in the same trip. Blade’s Edge speed is mostly about elevation discipline.
Where do I go after Blade’s Edge?
Most players pivot into Netherstorm or Shadowmoon Valley once Blade’s Edge density thins or quests go green—especially if the goal is fast leveling to 70.
